

From a drawing
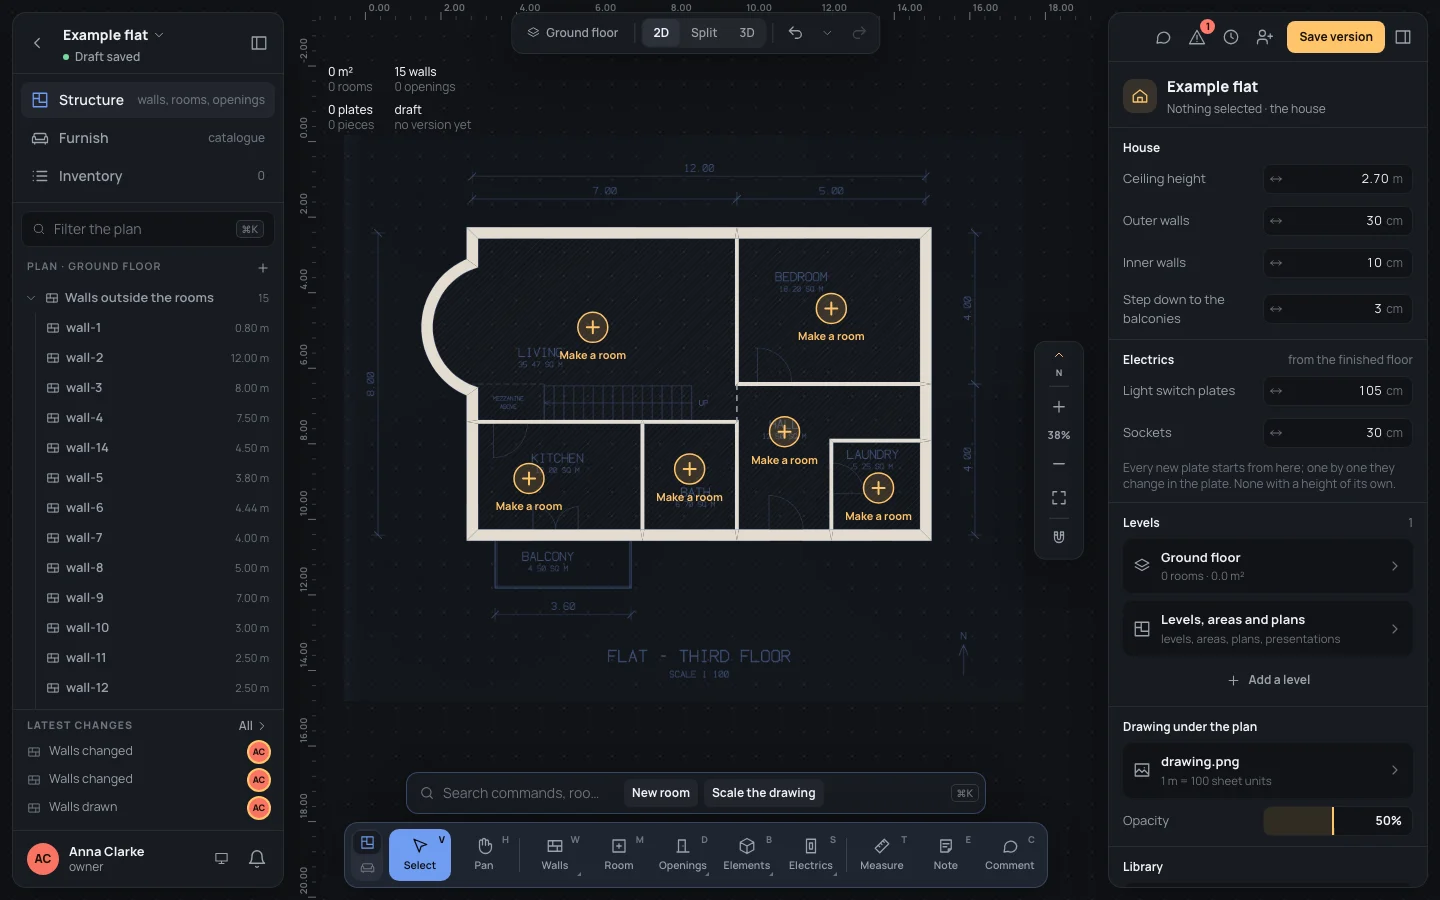
You have a scan of a floor plan and want the walls on it as a plan you can work on. In this tutorial you bring the example’s scan into an empty project, put it to scale, and trace its walls over it, letting the walls of the drawing pull your clicks onto their centre lines.
At the end the example flat’s walls are drawn over its scan: the outer walls 30 cm with the curved bay, the inner ones 10 cm, the separator between the living room and the hall, every length as the drawing’s dimensions say, and a Make a room offered in each space they close. It takes about 20 minutes.
You need drawing.png from the box above. The other two files aren’t needed here.
1. An empty project
Section titled “1. An empty project”- On your projects page, start a new project (Your projects).
- The new home’s guided setup opens. Click Leave, I’ll resume later at its top: this tutorial does by hand, in the editor, what the setup’s From the plans does for you (A new home).
- Open the project again from your projects page. The editor opens on an empty plan, with the house’s usual measures: ceiling 2.70 m, outer walls 30 cm, inner walls 10 cm.
If you went through the setup with From the plans instead, your drawing is in and to scale already: go on from step 4.
2. Bring the drawing in
Section titled “2. Bring the drawing in”- Press EscEsc so nothing is selected: the right panel shows the house. Under Drawing under the plan, click no drawing: upload one.
- Click Import a drawing and choose
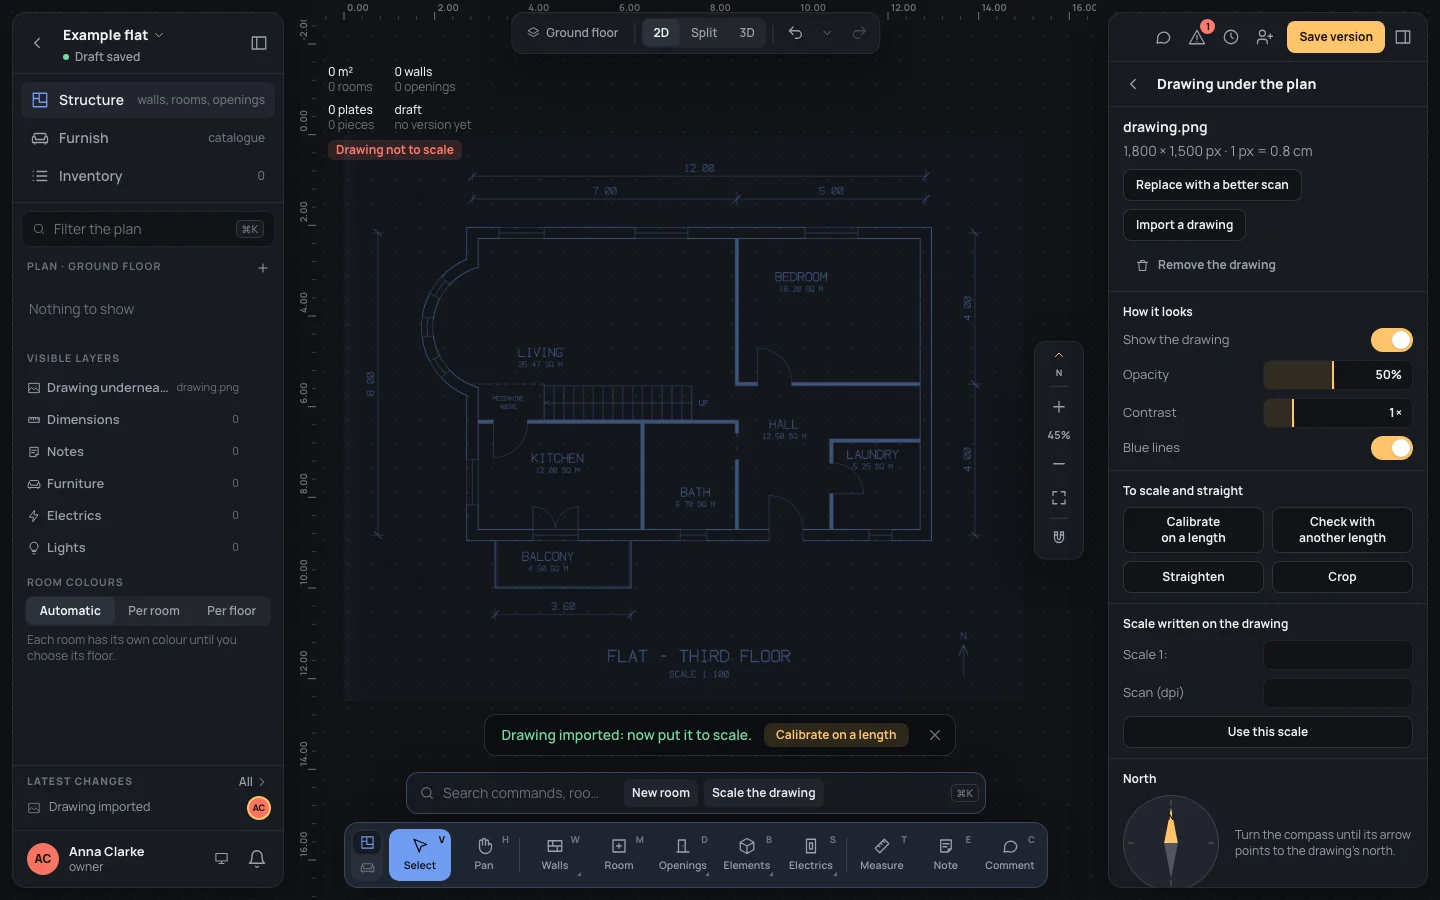
drawing.png, or drop the file on the page. - The view shows the whole drawing. Under the house’s numbers, top left, Drawing not to scale is in red, and a toast says Drawing imported: now put it to scale.
On an empty plan the drawing is laid 15 m wide, whatever it shows: the page says 1 px = 0.8 cm, which is wrong for this drawing. The next step puts it right. A PDF works too, a page at a time: see The drawing under the plan.
3. Put it to scale
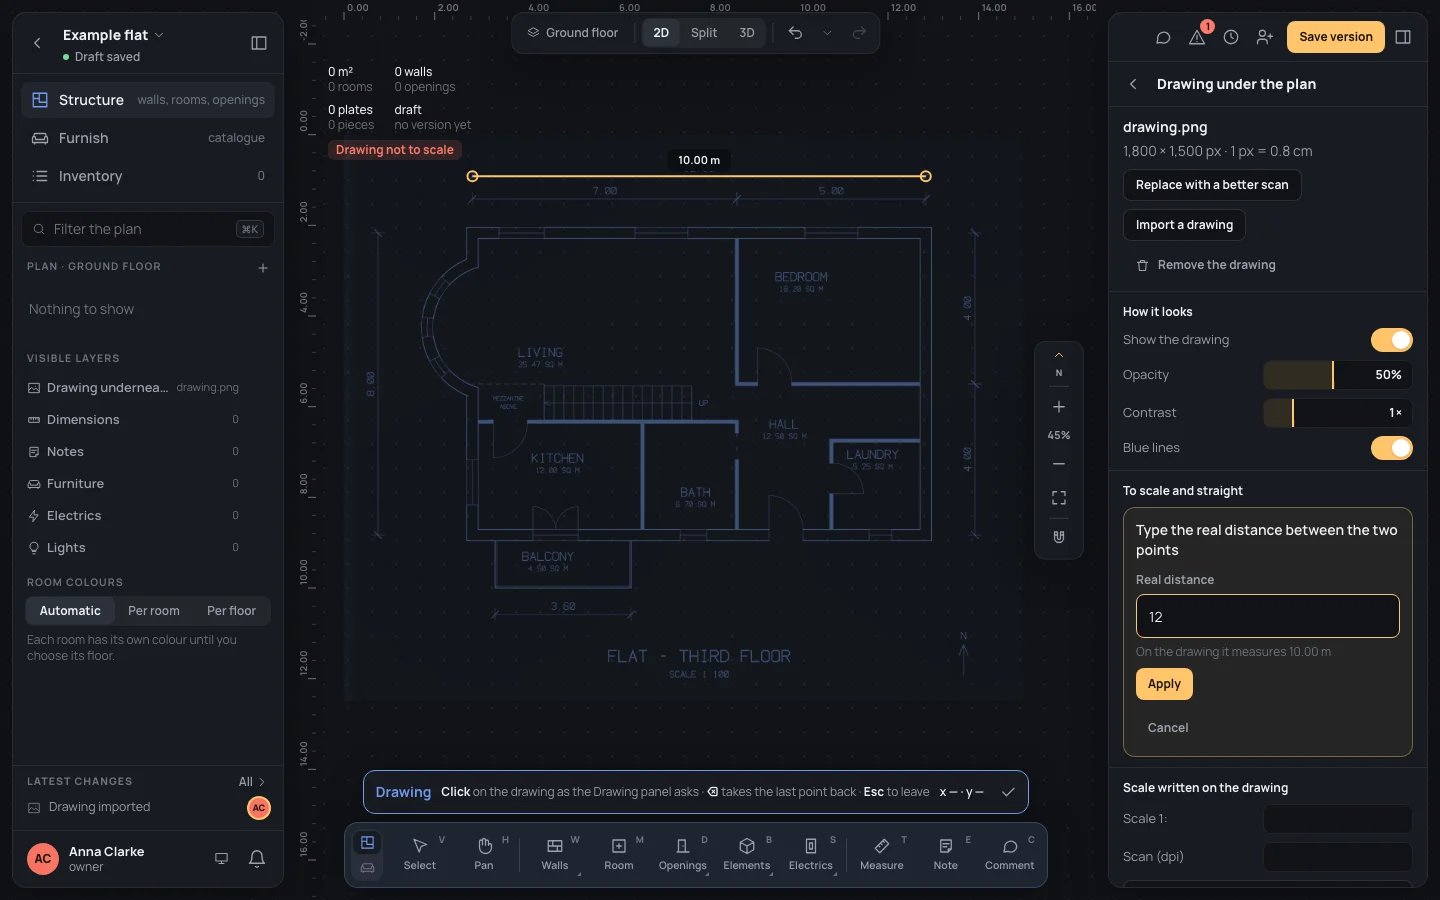
Section titled “3. Put it to scale”Calibrate on the longest dimension you can trust: on this drawing, the 12.00 at the top, over the whole flat.
- Press KK (or Calibrate on a length on the toast or the page).
- Click the left tick of the 12.00 dimension, then its right tick. The points go exactly where you click: zoom in first if you want to be precise (++). The line between them says how long it is now: 10.00 m.
- In Real distance, type Real distance
12and press ↵↵.
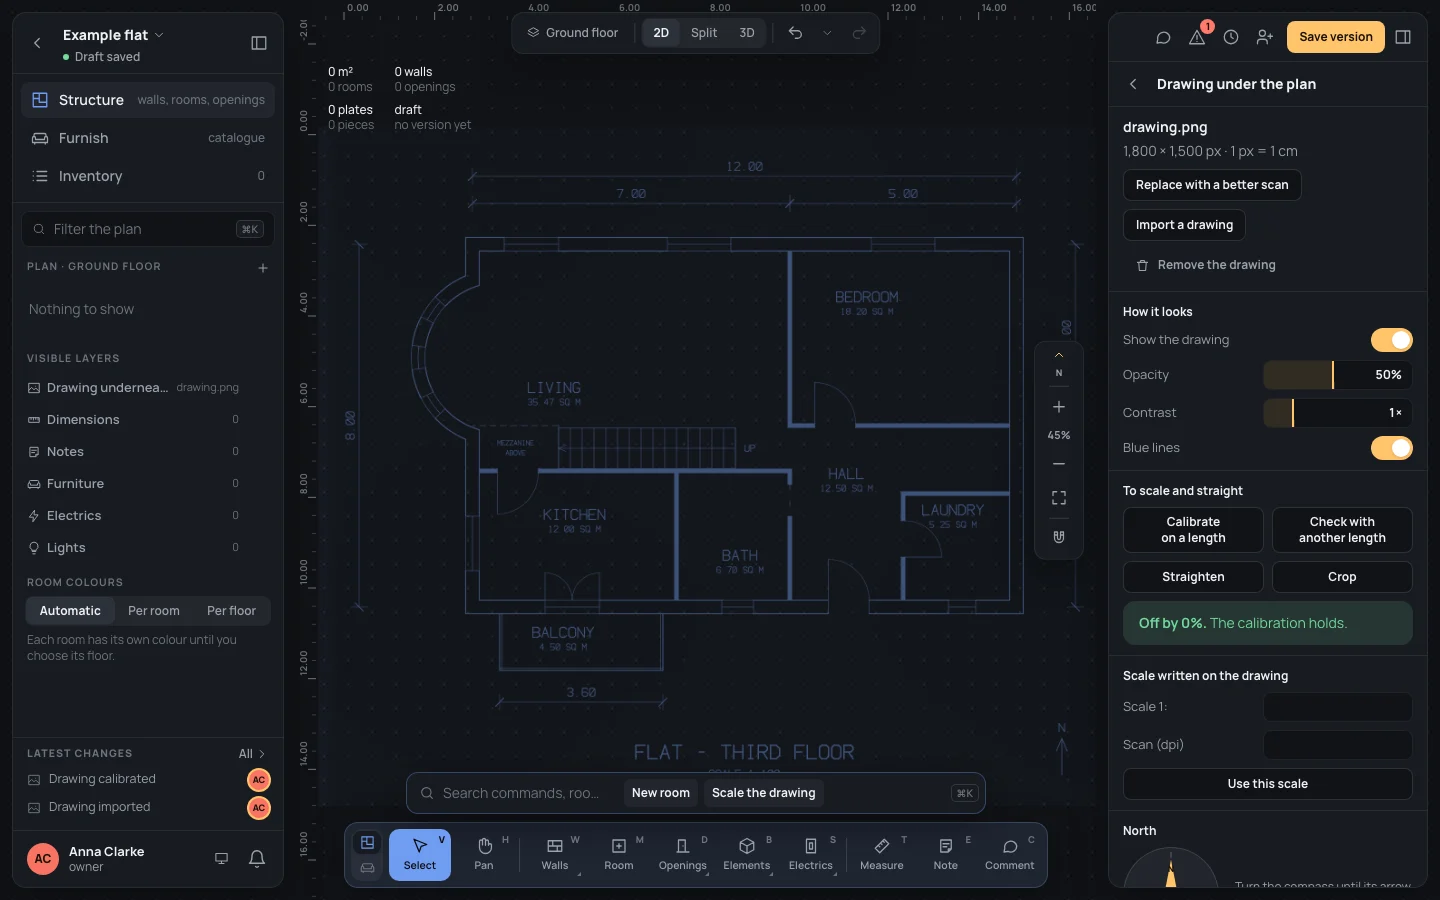
A toast says Drawing calibrated: 1 px = 1 cm, and so does the page. Now check it on another length, without changing anything:
- Click Check with another length.
- Click the top tick of the 8.00 dimension down the west side, then its bottom tick.
- Type Real distance
8and press ↵↵.
The page says Off by 0%. The calibration holds. Over 1% off, it would say Far off: calibrate again on a longer length. Calibrate again on the 12.00, clicking more carefully: each calibration replaces the last.
4. Straight and north
Section titled “4. Straight and north”A scan that came in askew has to be straightened before you trace: walls traced on a slanting drawing come out slanting.
- Look at a long line of the drawing against the ruler: the example’s north wall runs level, so it is straight.
- If yours isn’t: click Straighten under To scale and straight, click the start of a line that should be level or upright (a long outer wall), then its end. The drawing turns by the smallest turn that makes it so, and a toast says Drawing straightened.
- Further down the page, North: turn the compass until its arrow points to the drawing’s north, or type its Degrees. The example’s north arrow points straight up: leave it at 0°.
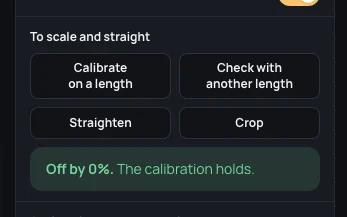
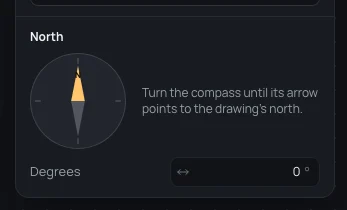
North is what turns the sun in the 3D view. Crop, opacity and the blue lines are on the same page: see The drawing under the plan.
5. The outer walls, with magnetic walls
Section titled “5. The outer walls, with magnetic walls”With a drawing under the plan, the Wall tool reads it under the pointer: where it shows a wall, the pointer is pulled onto that wall’s centre line, and the label says how thick it is drawn. That is a magnetic wall.
- Press WW. In the bar, type Thickness
30and press ↵↵. Leave Follow on Axis: the drawing’s walls are read only on the axis. - Move the pointer onto the north wall of the drawing, between two windows. A cyan dot sits on the wall’s middle line and the label says wall on the drawing · 30 cm, like the outer walls: the drawing’s two thin lines are read as one outer wall.
- Click the top end of the bay, on the west side, where the curve leaves the straight wall (80 cm below the north-west corner).
- Click the north-west corner, then the north-east one, the south-east one and the south-west one. Each wall follows the drawing’s centre line, whatever windows and doors the drawing shows on it: openings come later.
- Click the bottom end of the bay (the last wall reads 3.80 m · 90°), and press EscEsc to end the chain.
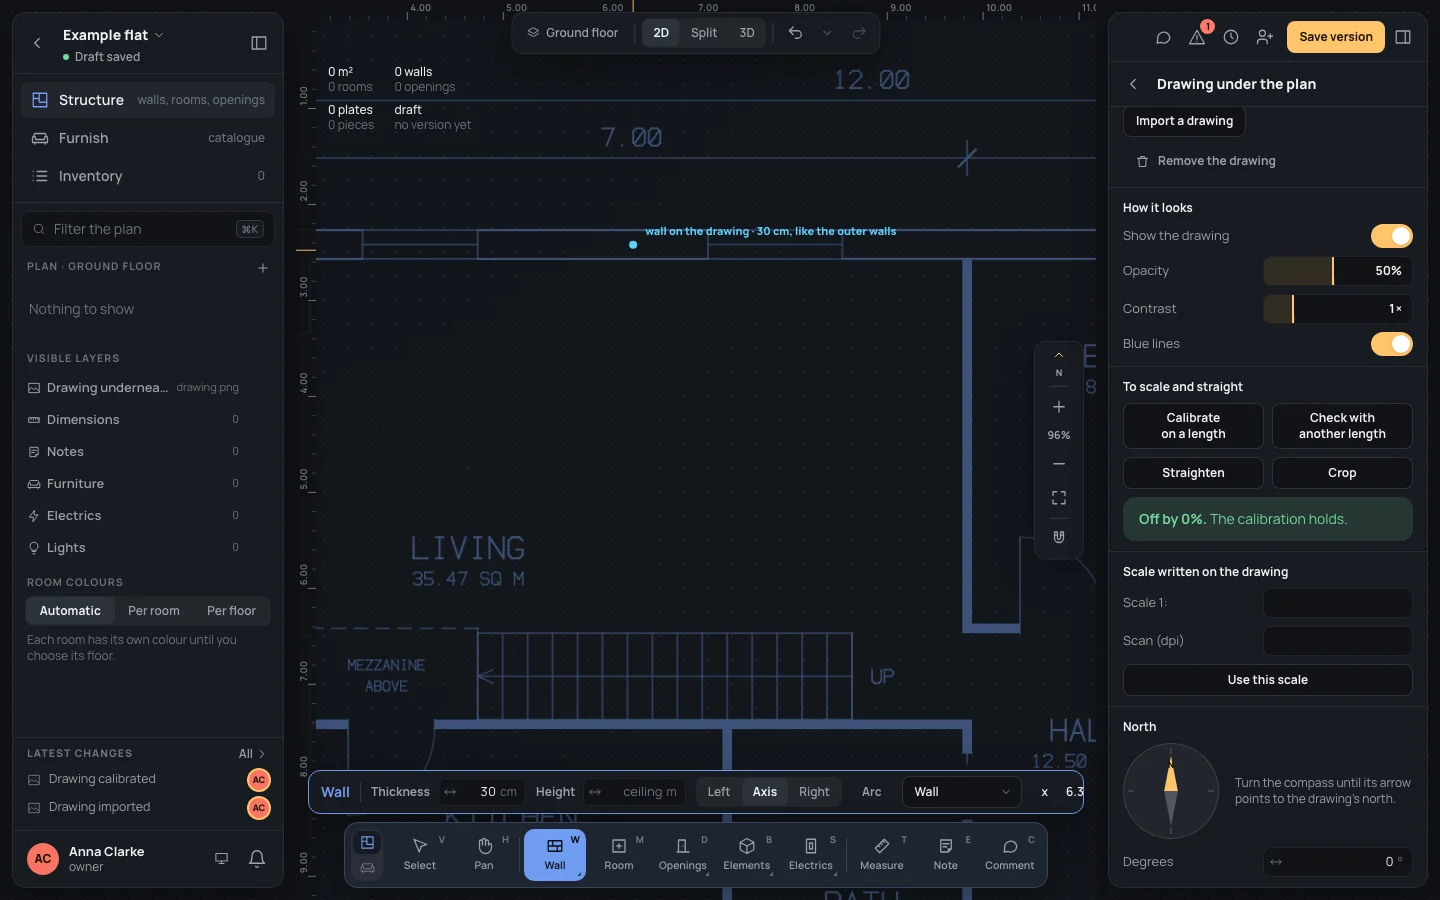
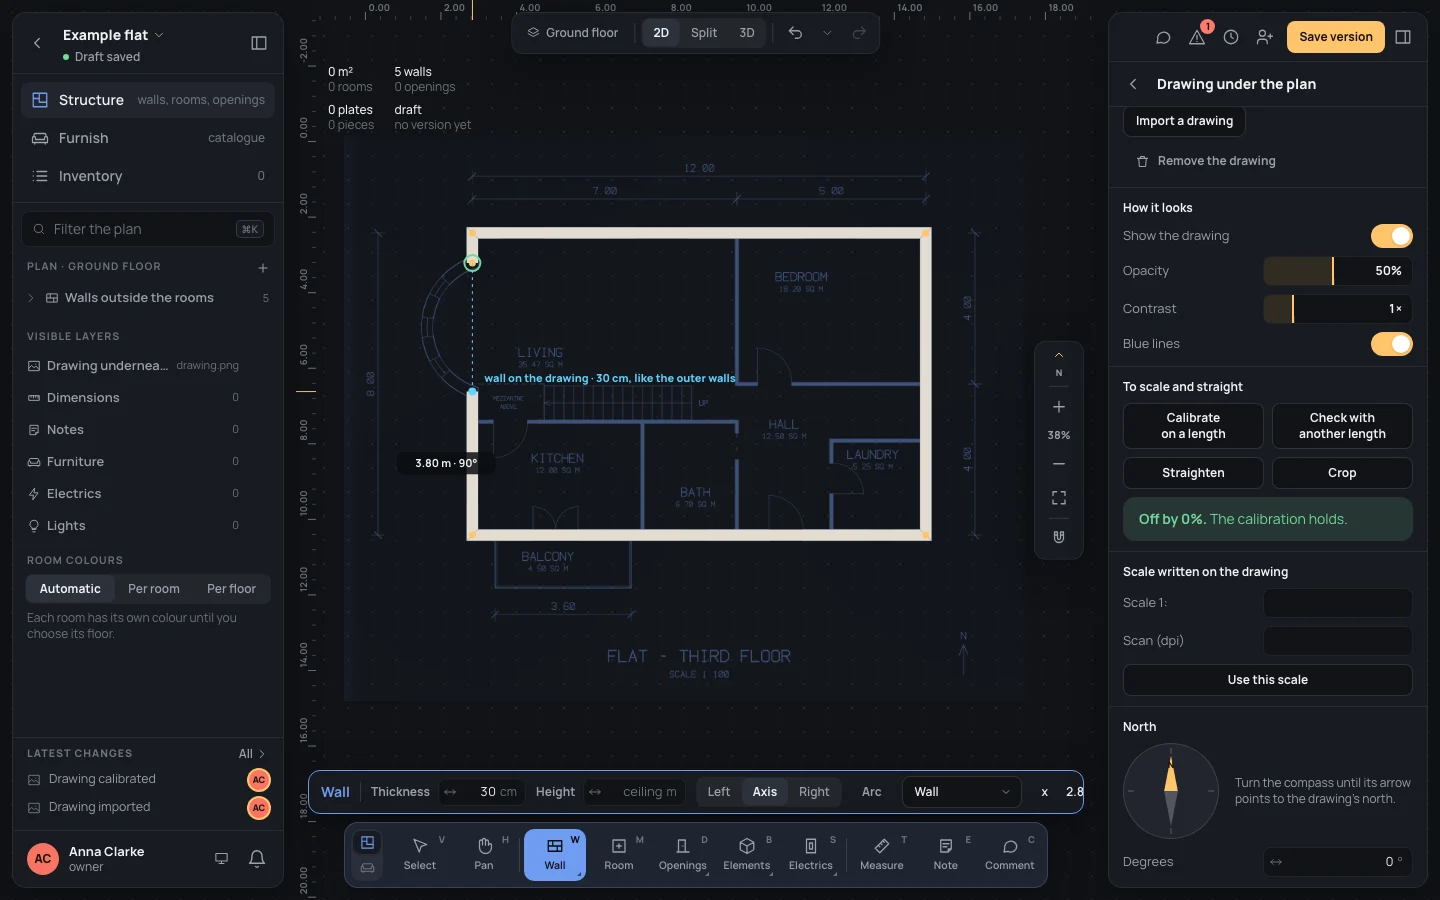
Why type 30 when the drawing gives it? A wall takes the drawing’s thickness from where it ends; at a corner the drawing shows two walls at once, and a wall ending there keeps the bar’s. With 30 in the bar, every outer wall is 30.
6. The bay, as an arc
Section titled “6. The bay, as an arc”- With the Wall tool still on, press AA. Arc lights up in the bar and a toast says Arc: click its end, then move to bend it.
- Click the bottom end of the bay, then its top end: both are ends of walls you drew, and the pointer snaps onto them (end).
- Move the pointer west, onto the middle of the bay’s curve on the drawing: the arc bends after it, its label giving its length and radius (4.43 m · R 1.81 m). Click.
- Press EscEsc to end it, then AA again for straight walls (Straight walls).
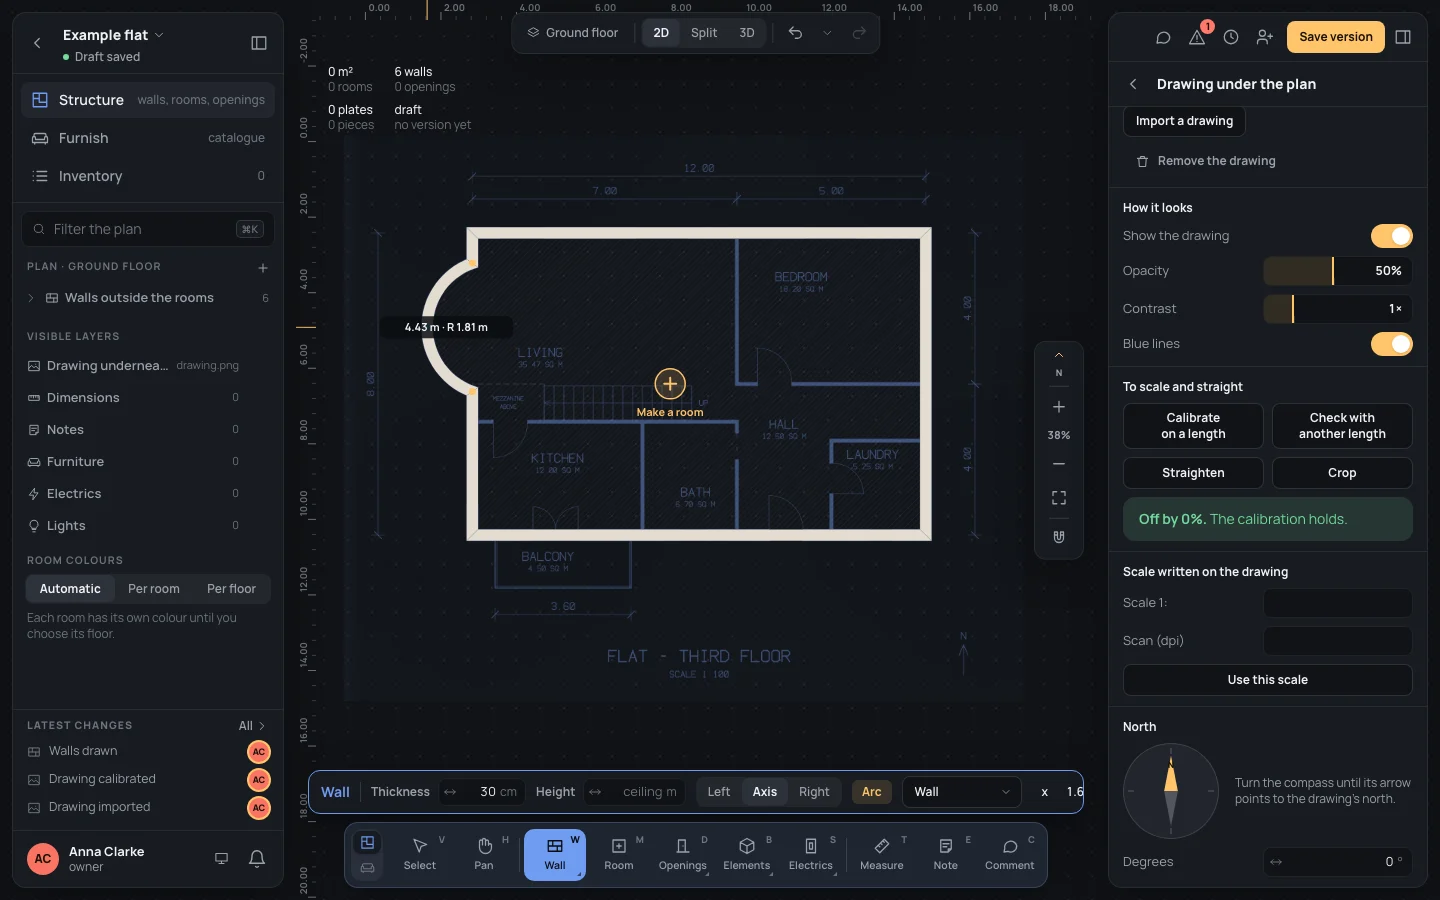
An arc carrying on from a straight wall leaves it tangent; the bay meets the west wall at a corner instead, so it is drawn as a chain of its own. You make its bulge exact in step 9. More on arcs in Wall.
7. The inner walls
Section titled “7. The inner walls”- In the bar, type Thickness
10and press ↵↵. - Click the magnet at the foot of the zoom column, on the right of the plan: Snapping opens. Untick Guides, then press EscEsc. (Why: see below.)
- Move onto the wall between the living room and the bedroom: wall on the drawing · 10 cm, like the inner walls. The drawing’s solid band is read as an inner wall.
- Click where it meets the north wall, then the bedroom’s south-west corner (4.00 m down), then the east wall. Press EscEsc.
- Click the west wall where the wall between the living room and the kitchen starts (5.00 m down from the north), then the end of that wall by the hall, then the south wall straight below it. Press EscEsc.
- Click the south wall under the laundry’s west wall, then the laundry’s north-west corner, then the east wall. Press EscEsc.
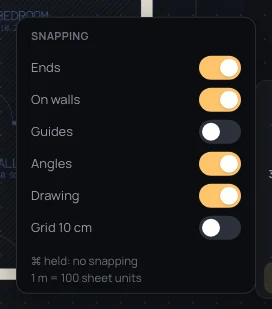
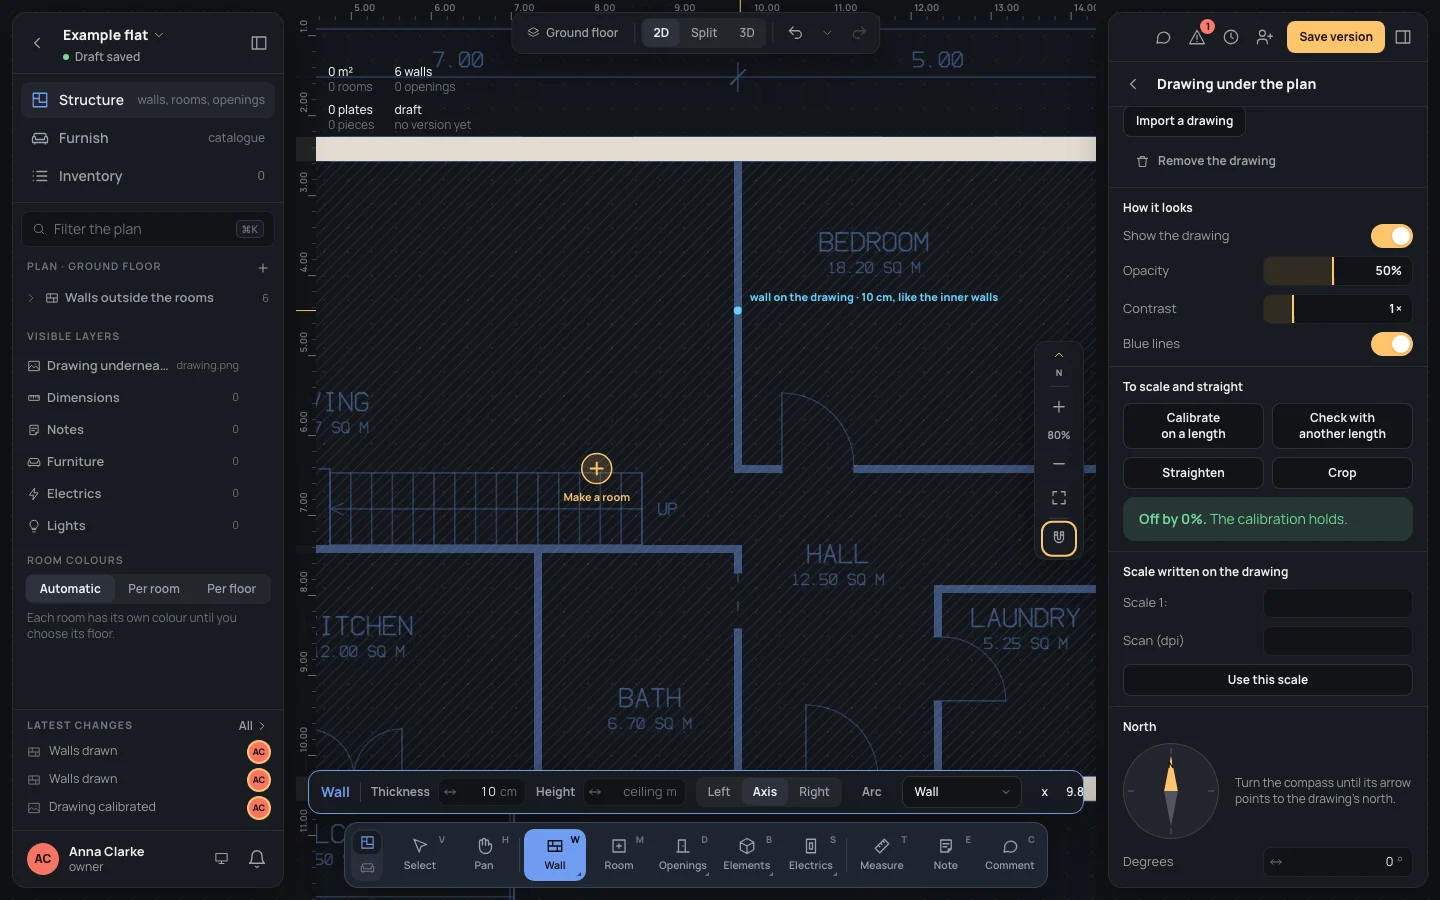
Where a click lands on a wall you drew already, it snaps onto it (on wall, perpendicular, end): the new wall meets it exactly.
8. A crossing, normalised
Section titled “8. A crossing, normalised”One wall is left, between the kitchen and the bath. Draw it with the commonest slip there is: starting a little outside the flat.
- Click just below the south wall, outside the flat, in line with the wall between the kitchen and the bath.
- Click the wall between the living room and the kitchen above, and press EscEsc twice.
- The new wall runs through the south wall: a toast says Some walls cross. with Normalise, and a red ! marks the crossing.
- Click Normalise. Normalise the walls says One crossing: the two walls are cut there and meet., and lists the stub left outside, 0.45 m, ticked to be deleted.
- Click Normalise: both walls are cut where they cross, and the stub goes. One step.
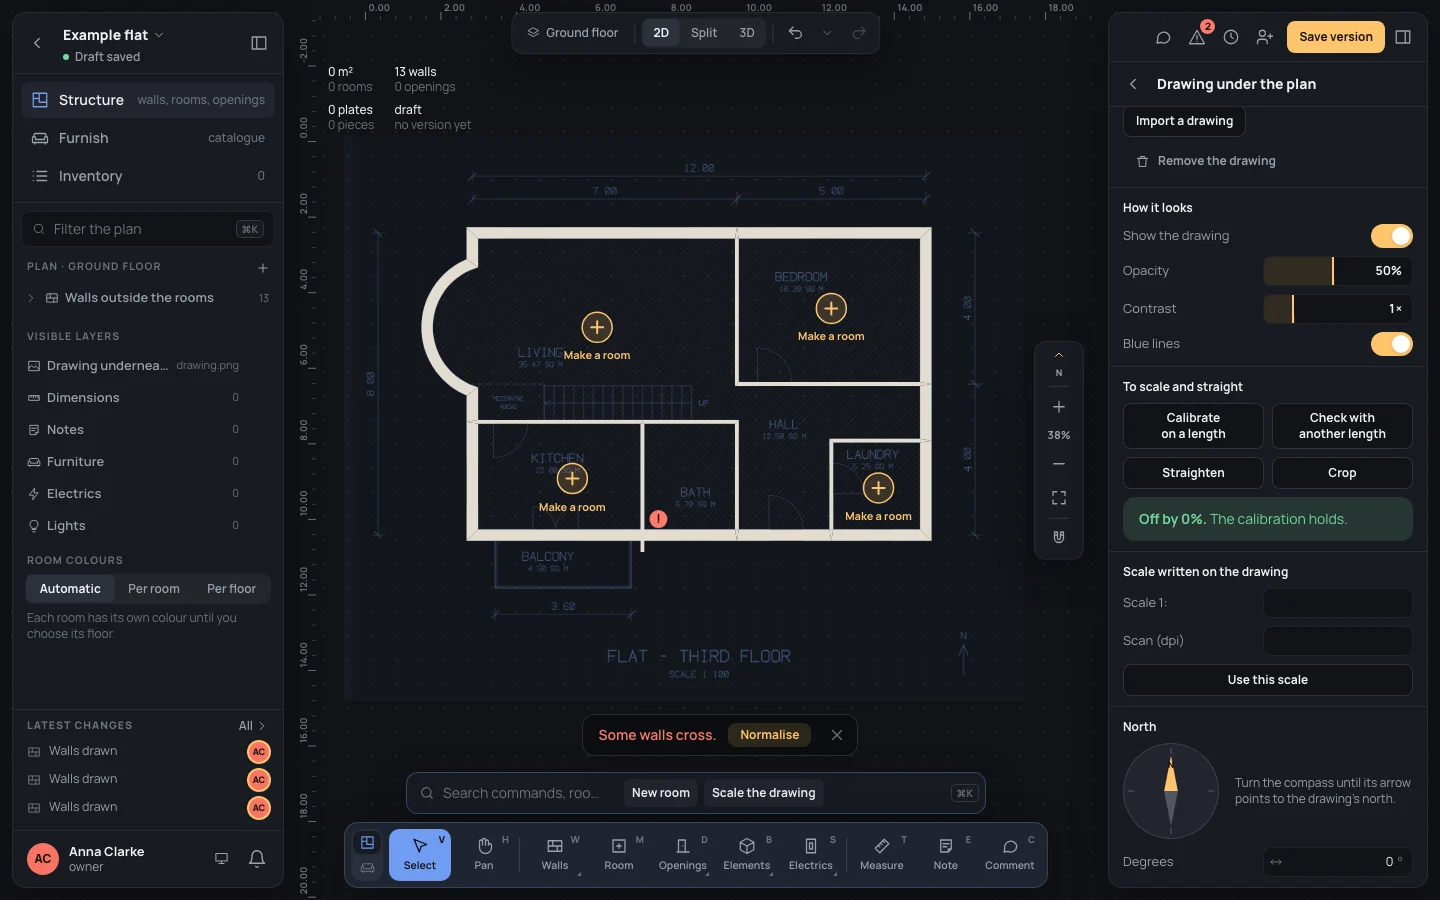
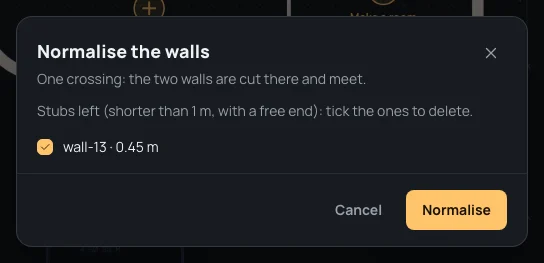
⇧NShift+N, or Normalise the walls in the Checks, does the same any time. The last wall is the separator between the living room and the hall, where the drawing shows an opening and nothing built:
- Press ⇧WShift+W: the Wall tool, set to Separator.
- Click the end of the wall between the living room and the bedroom (4.00 m down), then the end of the wall below it by the hall. Press EscEsc twice.
9. Check it against the drawing
Section titled “9. Check it against the drawing”- Press EscEsc so nothing is selected. In the left panel, open Walls outside the rooms: it lists every wall with its length: the north wall 12.00 m, the east one 8.00 m, the wall between the living room and the kitchen 7.00 m, the bedroom’s south wall 5.00 m, its west wall 4.00 m. They are the drawing’s dimensions: 12.00, 8.00, 7.00 + 5.00, 4.00 + 4.00. The south wall is in two now, 7.50 m and 4.50 m, cut by the normalising: 12.00 m together.
- Press TT and click the north-west corner, then the end of the wall between the living room and the bedroom on the north wall: 7.00 m, the drawing’s 7.00. Press EscEsc twice.
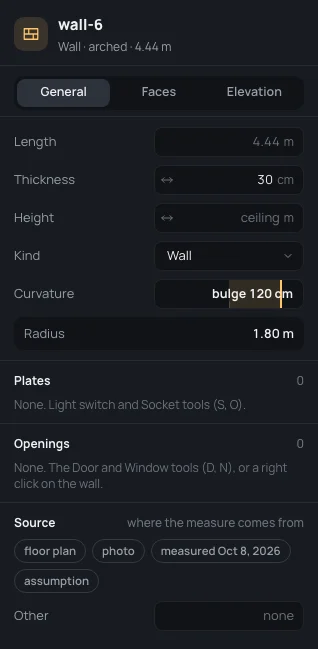
- Click the bay. Its inspector says Wall · arched · 4.44 m, with its Curvature and Radius. The drawing
gives the bay 1.20 m out from the west wall: if the Curvature doesn’t read bulge 120 cm, double click it,
type Curvature
120and press ↵↵. The Radius reads 1.80 m.
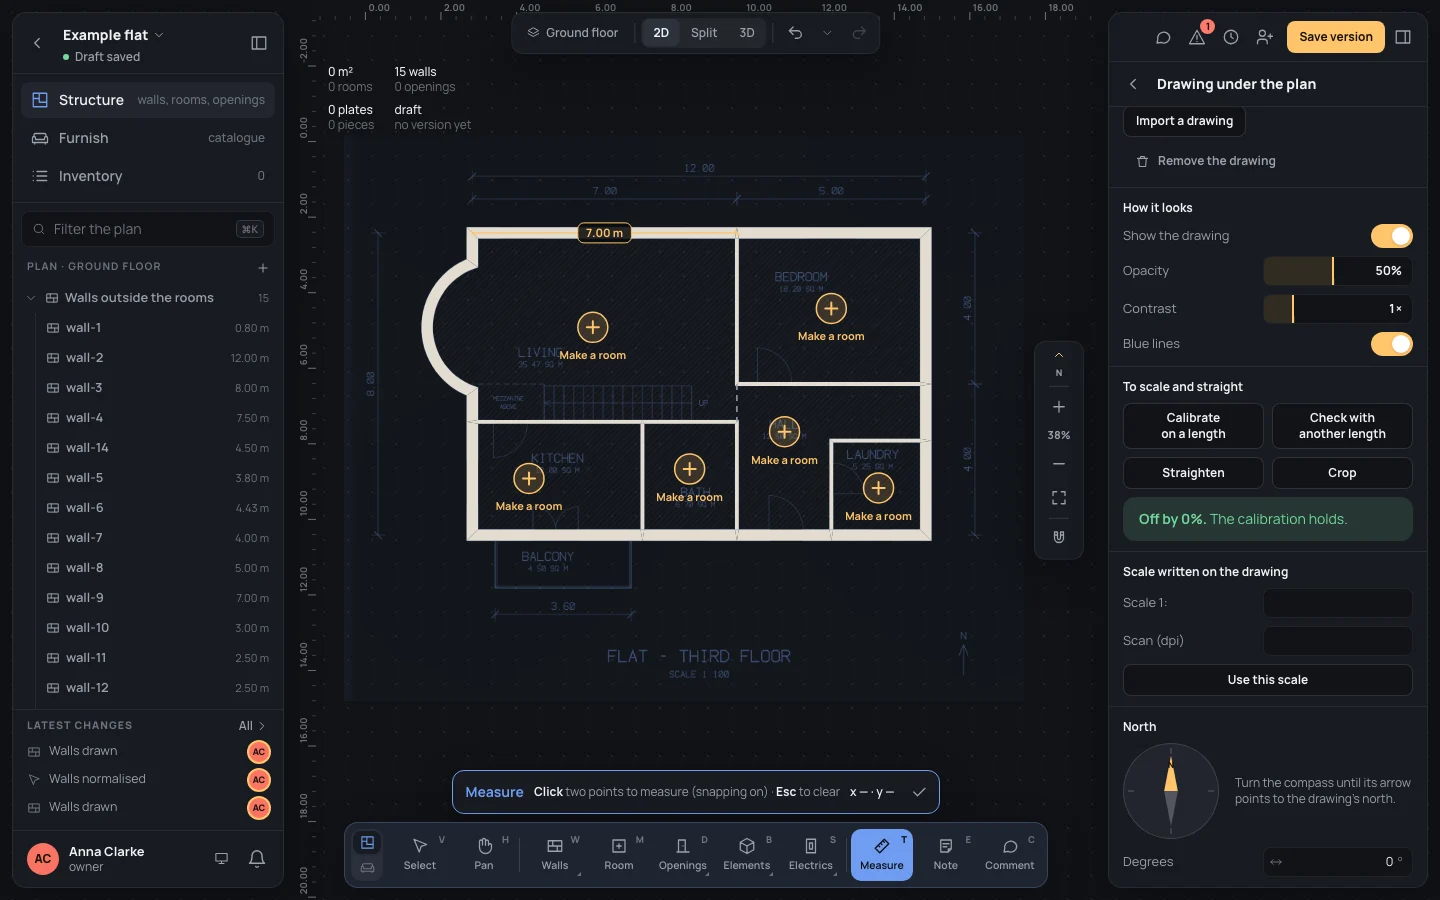
A length that doesn’t match means a corner landed on the wrong line: select the wall and type its Length, or drag its corner (Editing walls). The Checks list what is left: walls whose ends nearly meet, walls almost square.
What the magnet catches, and when it doesn’t
Section titled “What the magnet catches, and when it doesn’t”It catches a wall the drawing shows across the pointer: a solid dark band (an inner wall) or two thin lines with white between them (an outer wall), no thicker than the house’s thickest wall and 10 cm (40 cm here). It gives its centre line, and its thickness when that is one of the house’s: otherwise the label says not one of the house’s thicknesses, the chosen one stays.
It doesn’t catch:
- with Follow on Left or Right, or with ⌘Ctrl held, or with Drawing unticked in Snapping;
- a single thin line, as a window’s frame or a dimension: it is a line, not a wall;
- two walls drawn side by side, further apart than a wall can be;
- what comes first in the snapping order: an end, a middle, a wall already drawn, a guide, the angle (Snapping). That is why you unticked Guides in step 7. At the zoom where the whole flat is in view, 10 pixels on the screen are about 25 cm: a guide in line with the bay’s bottom end, 20 cm from the bedroom’s south wall, would pull its corner there. Zooming in does the same: the closer you are, the less reaches.
What can go wrong
Section titled “What can go wrong”- The lengths are all a little off. The calibration is: check it on the 8.00, and calibrate again on the 12.00 if it is over 1% off. Calibrating doesn’t move walls already drawn: trace after calibrating.
- A wall came out 10 cm instead of 30. It ended on a corner, or the bar had 10. Select it and type its Thickness.
- A corner landed beside the drawing’s corner. Something else caught it first: ⌫⌫ takes the last corner back while you draw, ⌘ZCtrl+Z takes back a whole chain.
- The bay bent the wrong way. Your click to bend it landed on the other side: ⌘ZCtrl+Z, or type its Curvature.
- New walls come out as separators. The bar keeps the last Kind: set it back to Wall.
Each closed space has a Make a room in it: Rooms names them. The windows and doors the drawing shows go on with the opening tools: Doors and windows. The balcony and the mezzanine are the next tutorial, A balcony and a stair.
See also
Section titled “See also”- The drawing under the plan and Calibrate the drawing
- Wall: the bar, typed lengths, arcs, magnetic walls
- Snapping and Checking the home