

A balcony and a stair
This tutorial takes a home with two levels and joins them up: the balcony on the south side becomes an outdoor room,
a step below the kitchen, and a straight stair climbs from the living room to the mezzanine above the kitchen. You
work on the example flat’s walls only (bare.home.json).
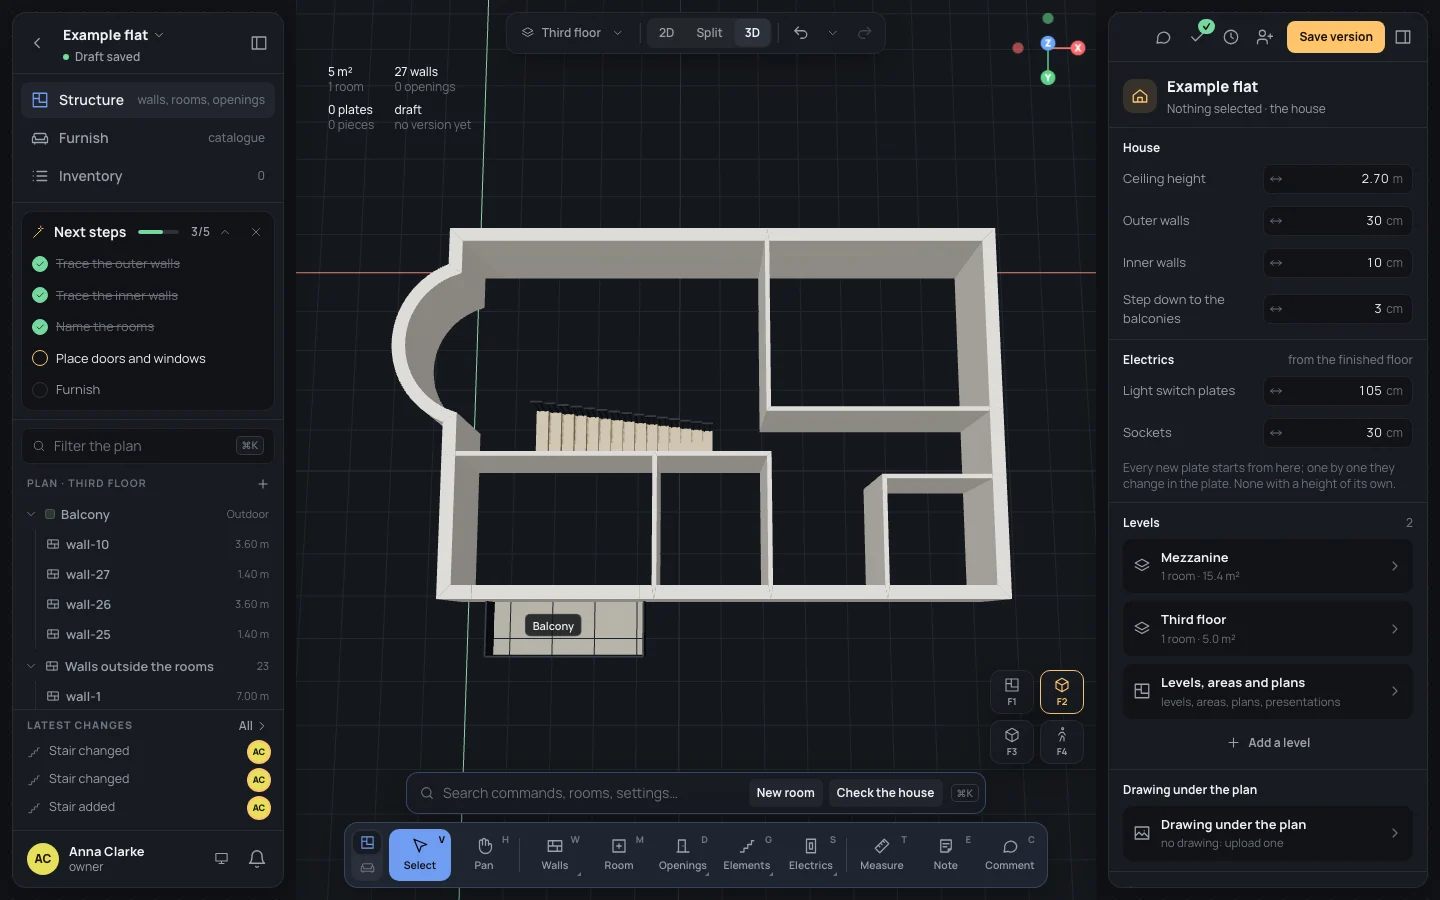
At the end the third floor has its balcony, 5.0 m² behind its railing, and a stair of 16 risers along the living room’s south wall; the mezzanine has its room and the opening the stair arrives by. It takes about 15 minutes.
1. Open the bare home
Section titled “1. Open the bare home”-
Download
bare.home.jsonfrom the box above. -
Start a new project (A new home): in the wizard, click Ready in the column of steps, then Open the editor. Then choose Import a home… in the project’s menu (its name, top left) and pick the file.
-
The plan shows the third floor’s walls, each closed space hatched with Make a room. The editor starts with the Wall tool in hand: press VV to go back to Select.
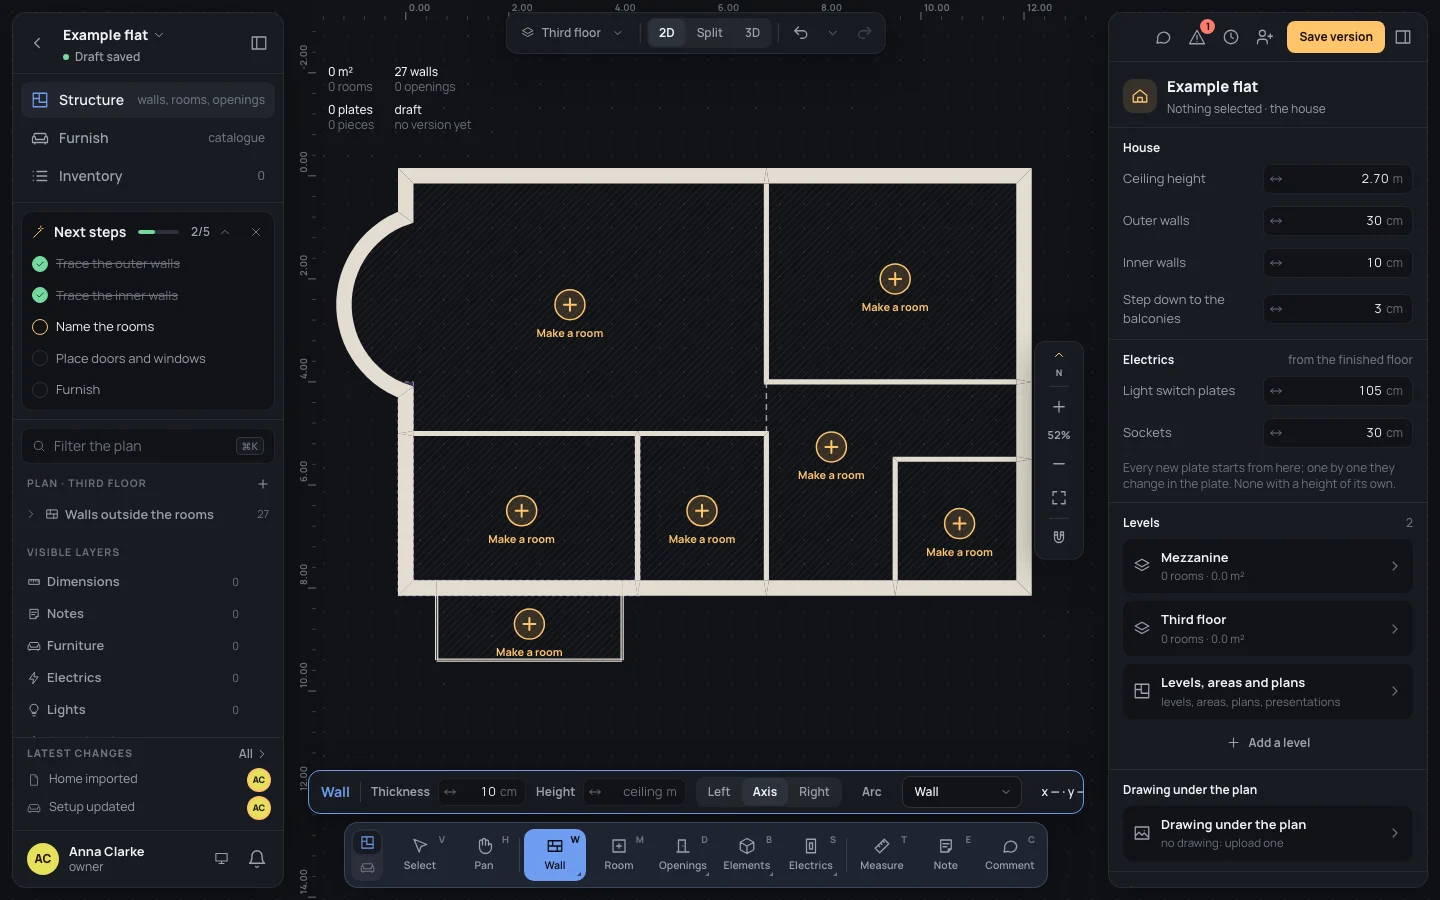
The bare home already has what the plan’s drawing gives: the walls of both levels, the balcony’s railing, and the Mezzanine level with its plan. You add the rooms, the step down and the stair.
2. The balcony
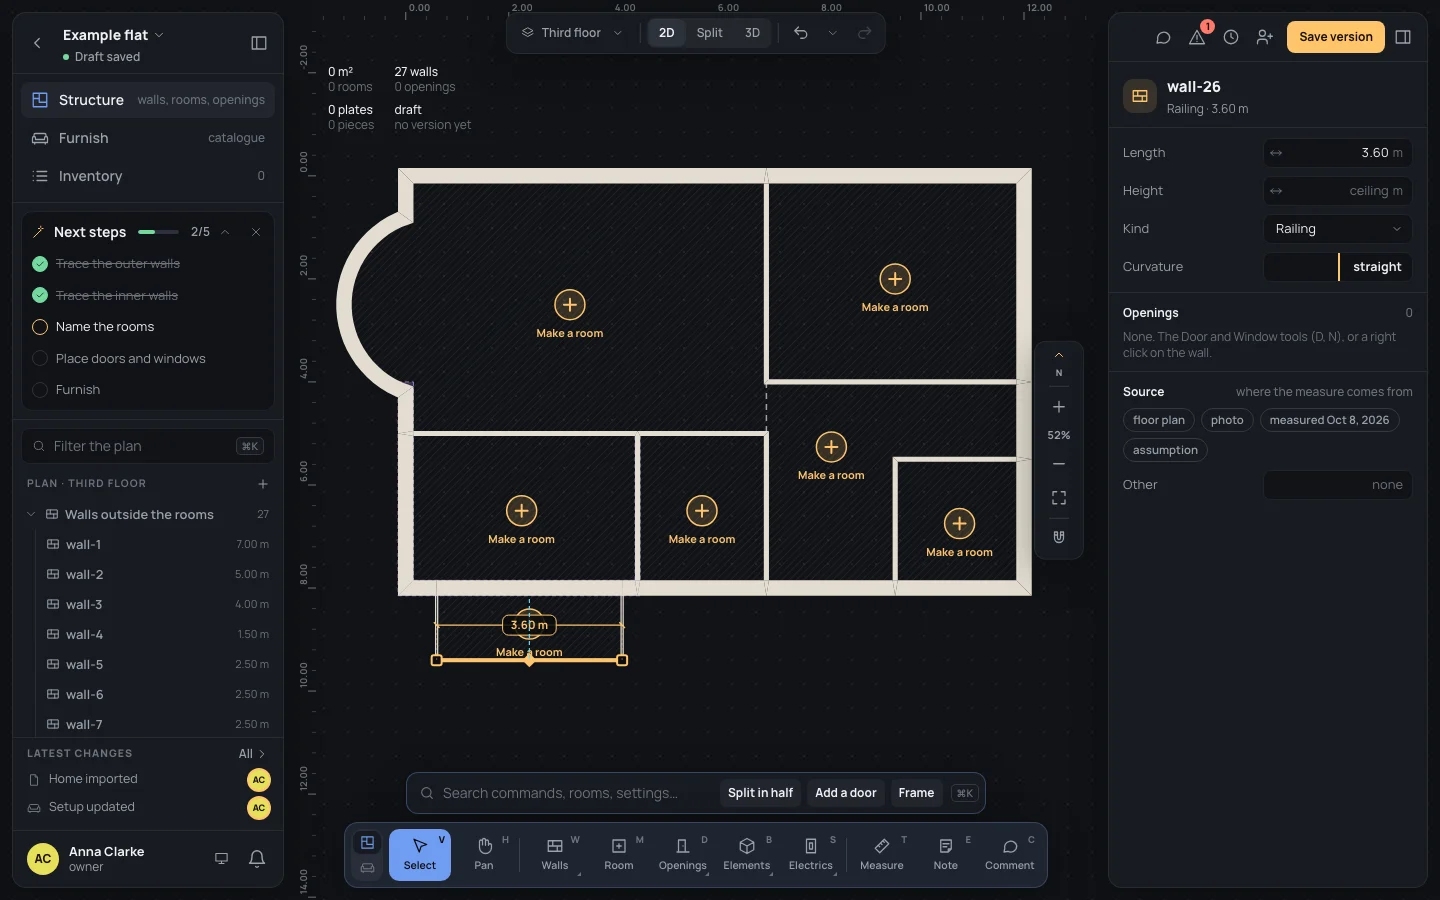
Section titled “2. The balcony”The balcony is the small region south of the kitchen, 3.60 × 1.40 m, closed by the outer wall and a railing in three pieces.
-
Click the railing’s long side. The inspector says wall-26, Railing · 3.60 m, its Kind Railing: a slim barrier, always 4 cm, with no plates on it. If your own plan has none, draw it with the Wall tool set to Railing, from the outer wall and back to it.
-
Press EscEsc, then MM for the Room tool. Click inside the balcony’s hatched region. The room is made and its Name is ready: type Name
Balconyand press ↵↵. -
In the inspector’s General tab, set What it is for to Balcony or terrace, and under Floor click Outdoor. The heading reads Room · Outdoor: an outdoor floor is what makes a room a balcony, a step down and open to the sky.
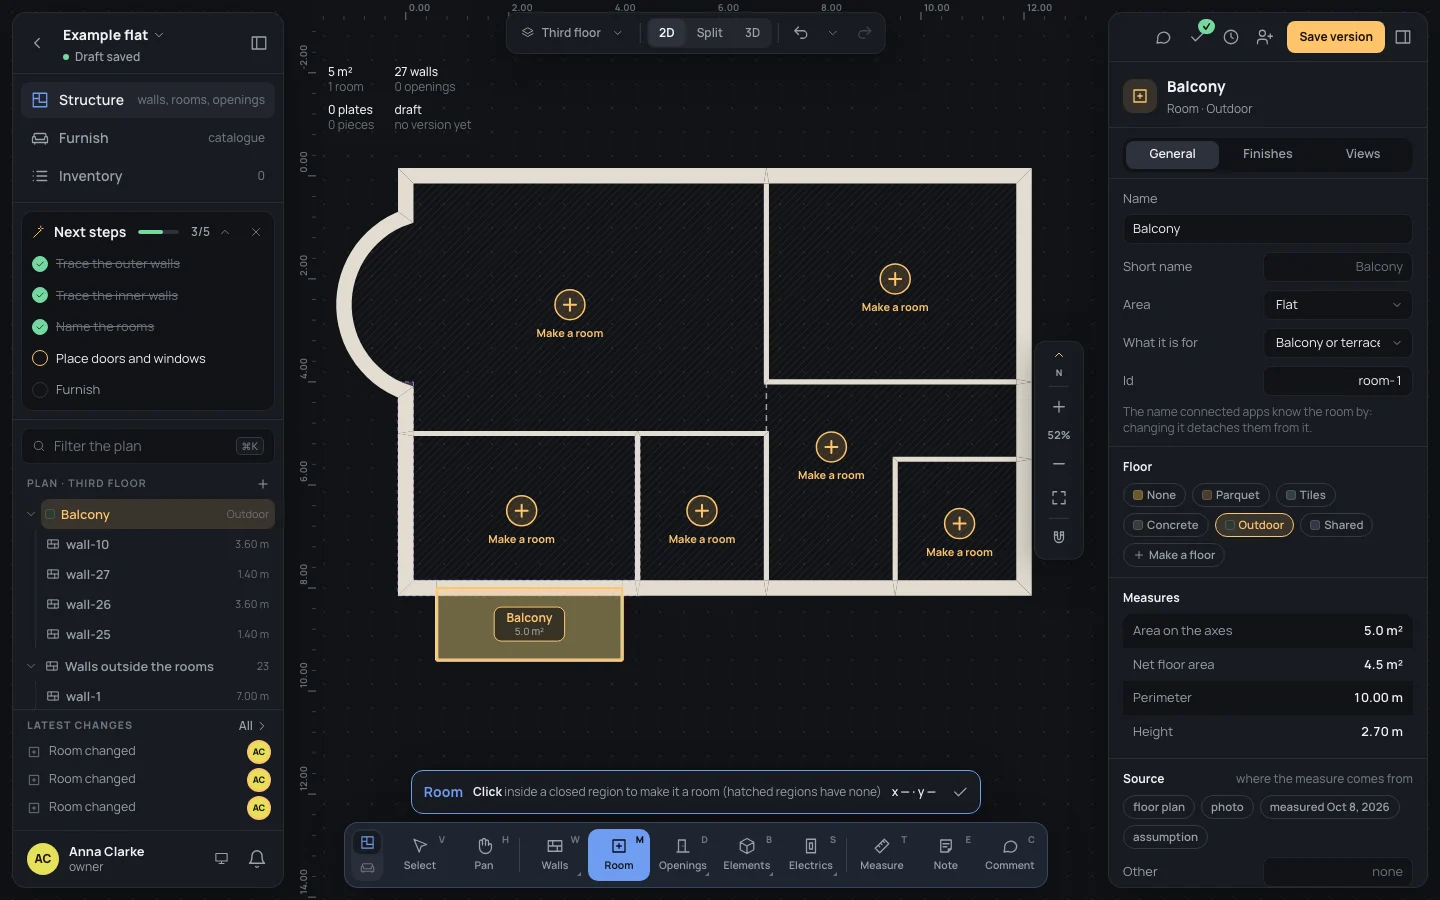
Its measures read 5.0 m² on the axes, 4.5 m² net and 10.00 m of perimeter.
-
Press EscEsc twice: with nothing selected the inspector shows the house. Step down to the balconies, under House, says how far below the plan’s floor an outdoor floor sits: the example has Step down to the balconies
3cm. Type your own if your balcony is lower; 0 for none.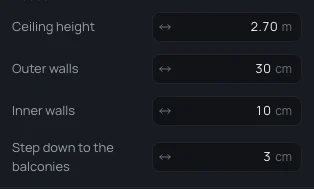
-
Choose 3D in the pill at the top and press F2F2: the balcony stands out from the south wall behind its railing, its floor 3 cm lower than the kitchen’s.
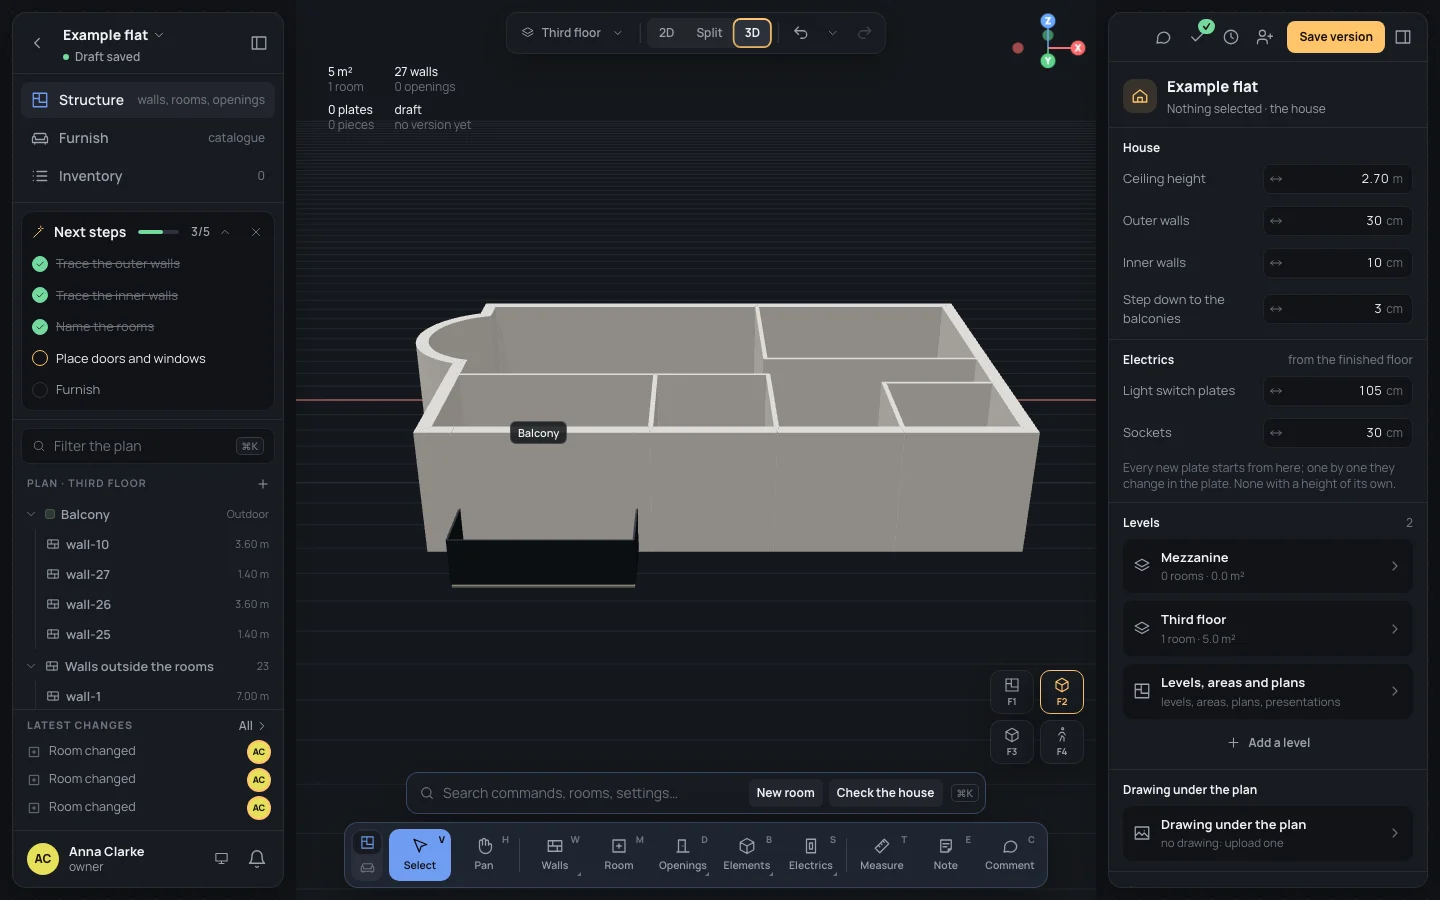
Choose 2D again before going on.
3. The mezzanine’s level and room
Section titled “3. The mezzanine’s level and room”-
With nothing selected, the house’s inspector lists its Levels, the highest first: Mezzanine, 0 rooms, and Third floor, 1 room · 5.0 m². The mezzanine stands at 11.85 m, 2.85 m above the third floor’s 9.00 m.
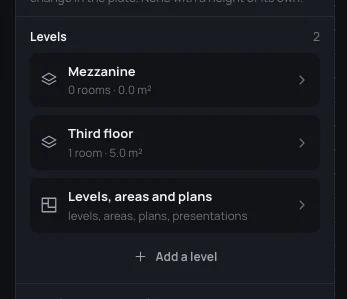
In a house of your own with one floor, Add a level here adds one (you name it; its elevation is suggested 3 m above the highest), and A new plan on the structure page puts a plan on it to draw its walls: both are in Stairs and levels.
-
Open the mezzanine’s plan with the Plan picker at the top. Its walls are already there, the third floor seen through under them (Other levels, in the left panel’s Visible layers, hides it).
-
Press MM and click inside the mezzanine’s region. Type Name
Mezzanineand press ↵↵. Set What it is for to Study and its Floor to Parquet.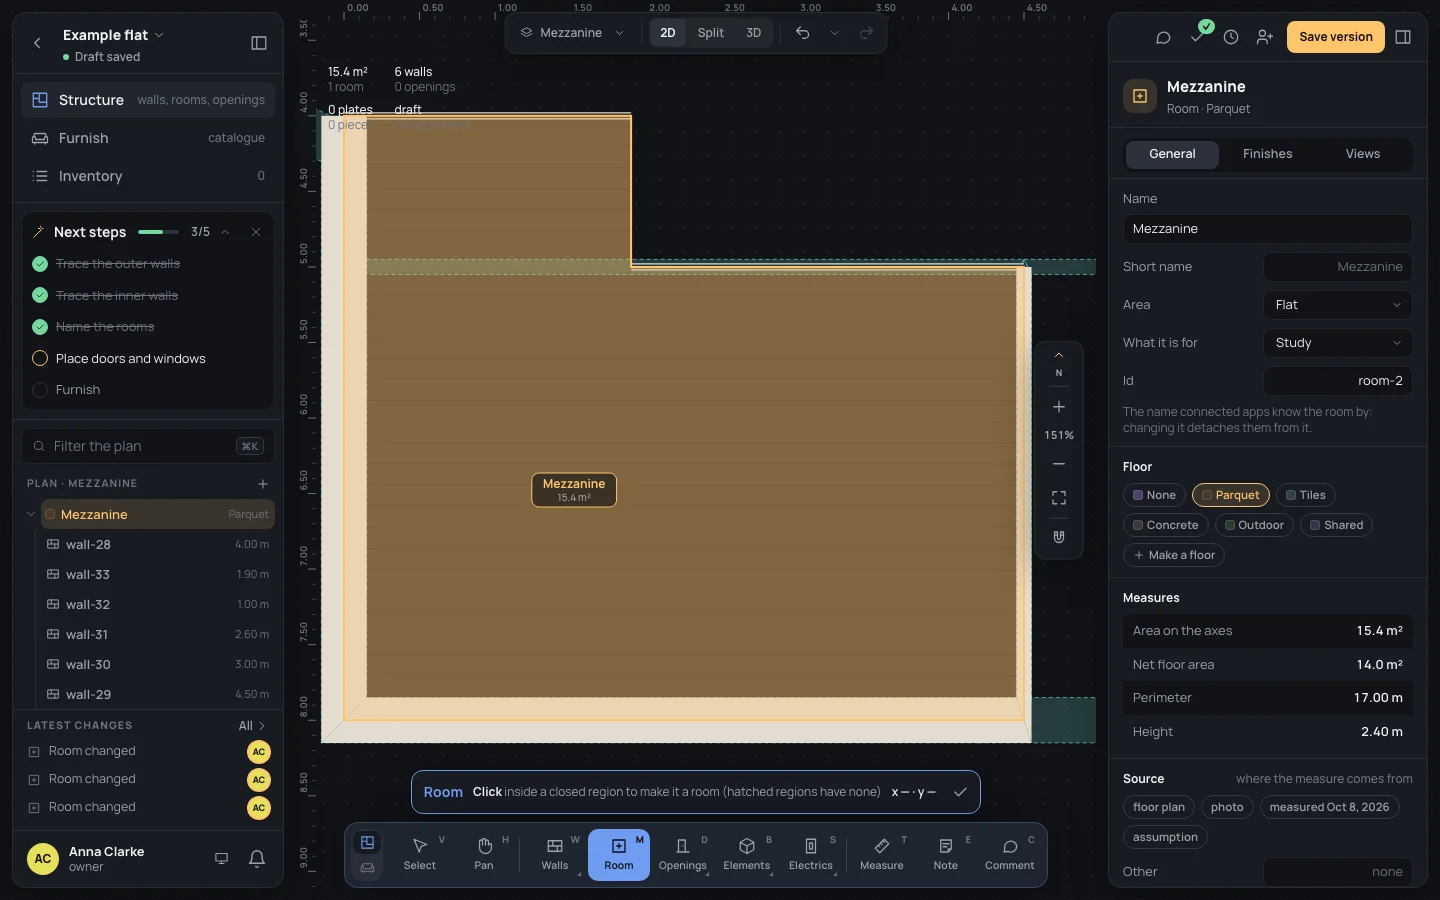
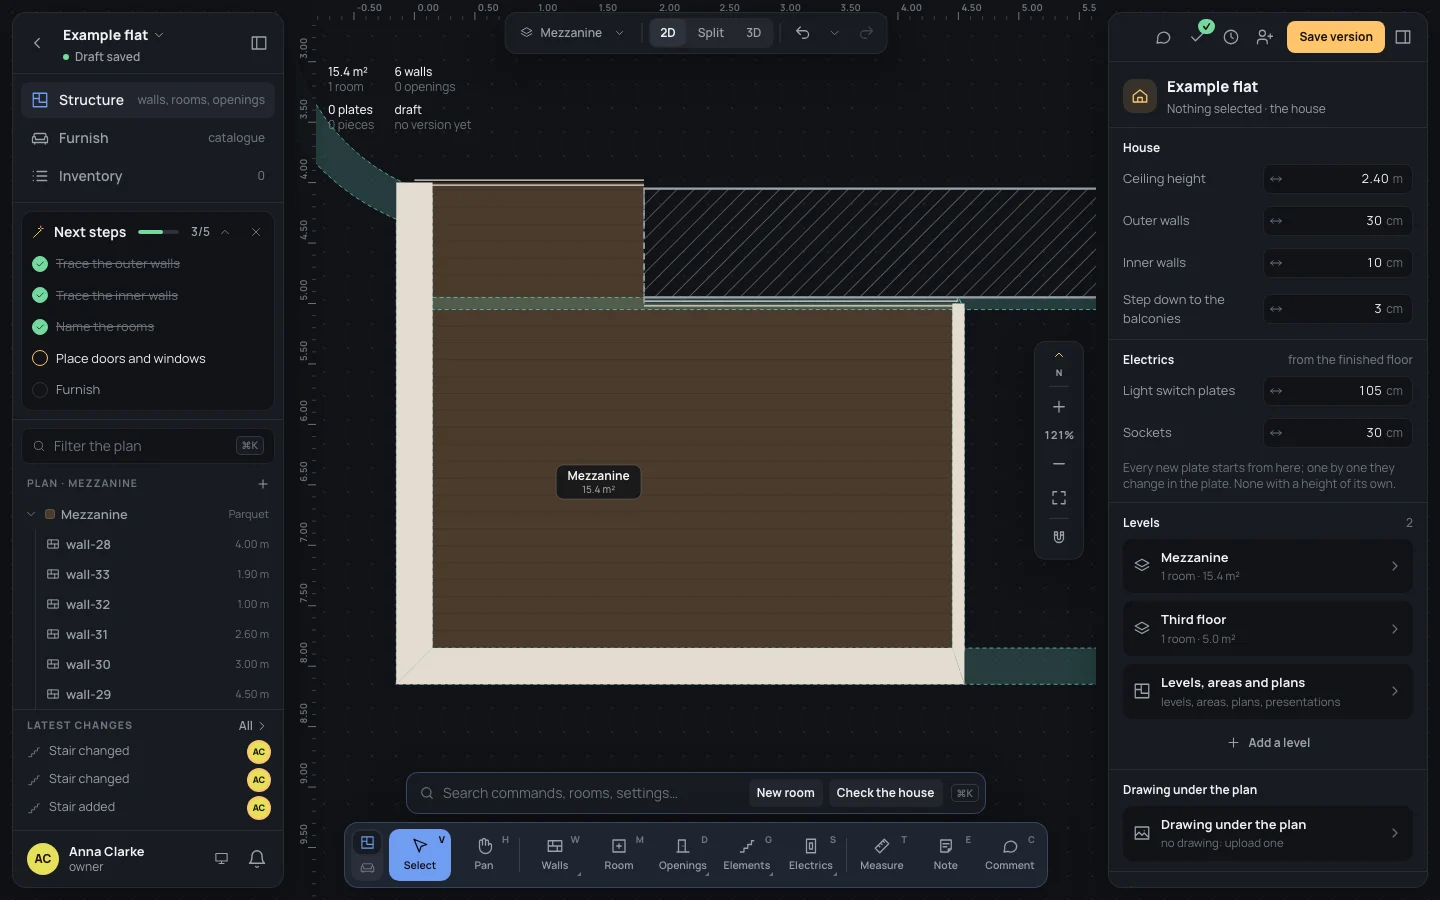
It measures 15.4 m² on the axes and 14.0 m² net, with the mezzanine’s ceiling at 2.40 m.
4. The stair from the living room
Section titled “4. The stair from the living room”The stair runs along the living room’s south wall, from beside the hall westwards, up to the mezzanine’s landing. The Stair tool has the details; here are the clicks.
-
Open Third floor with the Plan picker. A stair is drawn on the plan it starts from.
-
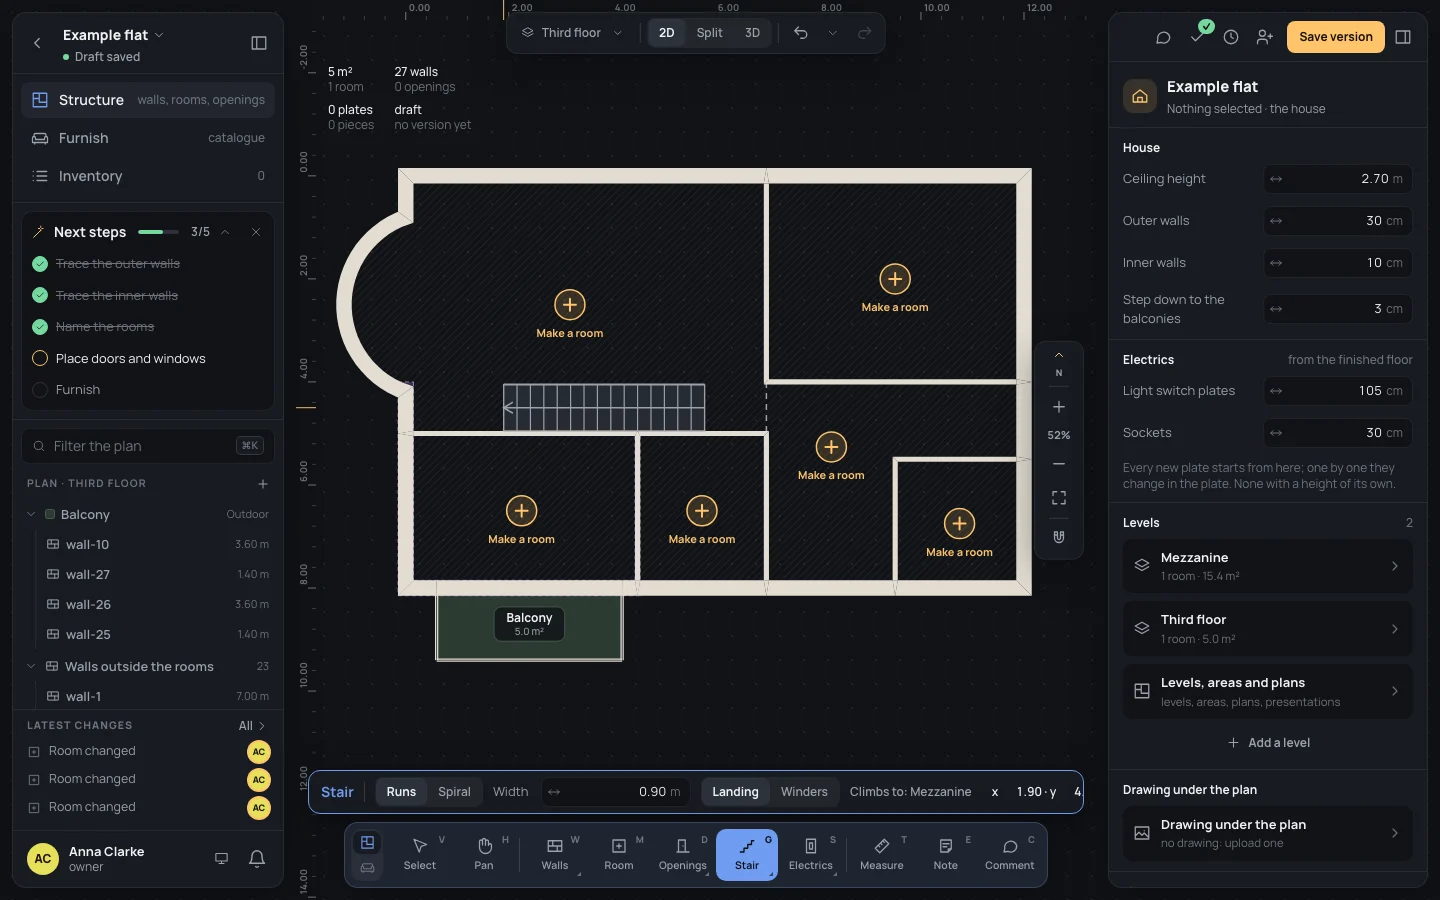
Press GG (in the dock, Elements › Stair). The bar reads Climbs to: Mezzanine: leave Runs, Landing and Width
0,90.
-
Click where it starts, at x 5.80 · y 4.50 (the bar shows where the pointer is), then move west: the stair is drawn as it would be, with its treads and the arrow going up.
-
Click where it arrives, at x 1.90 · y 4.50, a run of 3.90 m, and press ↵↵.
The stair is made and selected. Its inspector says Straight, Climbs to Mezzanine, Risers Worked out (16): 2.85 m in 16 risers of 17.8 cm, goings of 26 cm, a pace of 61.6 cm, and Comfortable in green.
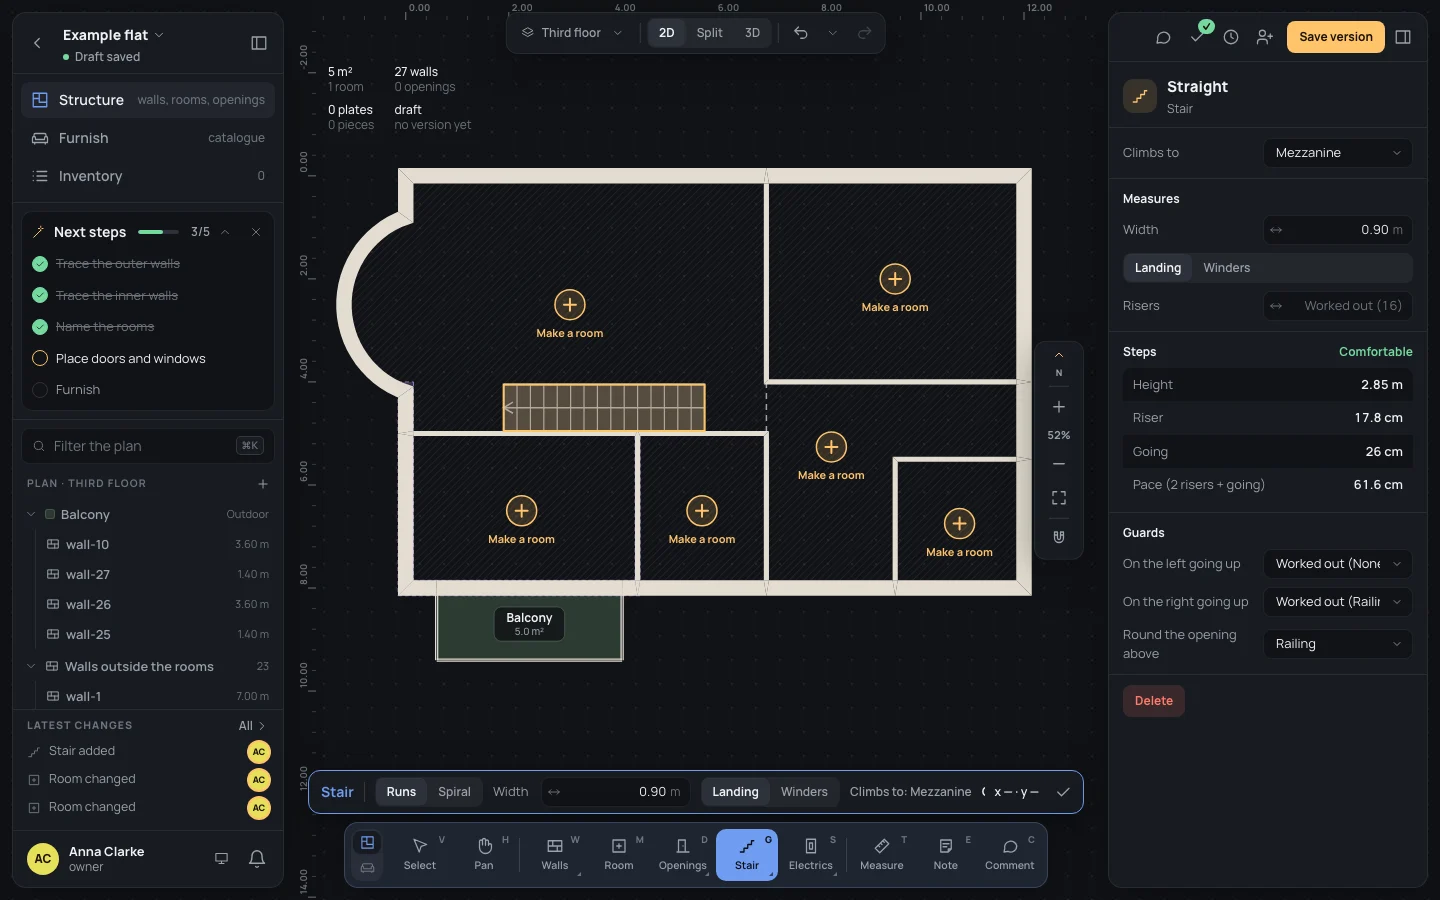
A comfortable stair has risers of 18 cm at most, goings of 22 cm at least and a pace between 60 and 66 cm. Type
Risers14 in Risers to see the difference: each riser becomes 20.4 cm and the stair says
what is wrong in red. Empty the field and press ↵↵ to get the 16 back. Its Guards are worked
out: none on the left going up, against the wall; a railing on the right, over the living room; a railing Round the
opening above. All of it is in Stairs and levels.
5. The opening above
Section titled “5. The opening above”Press VV for Select, then open Mezzanine with the Plan picker. Where the stair arrives, the mezzanine’s floor is open: the stair’s outline is hatched beside the room, and in 3D a railing goes round it. Nothing to draw: it follows the stair below, and moves with it.
6. Both levels in 3D
Section titled “6. Both levels in 3D”The 3D shows the plan that is open: the Plan picker changes the 3D too.
-
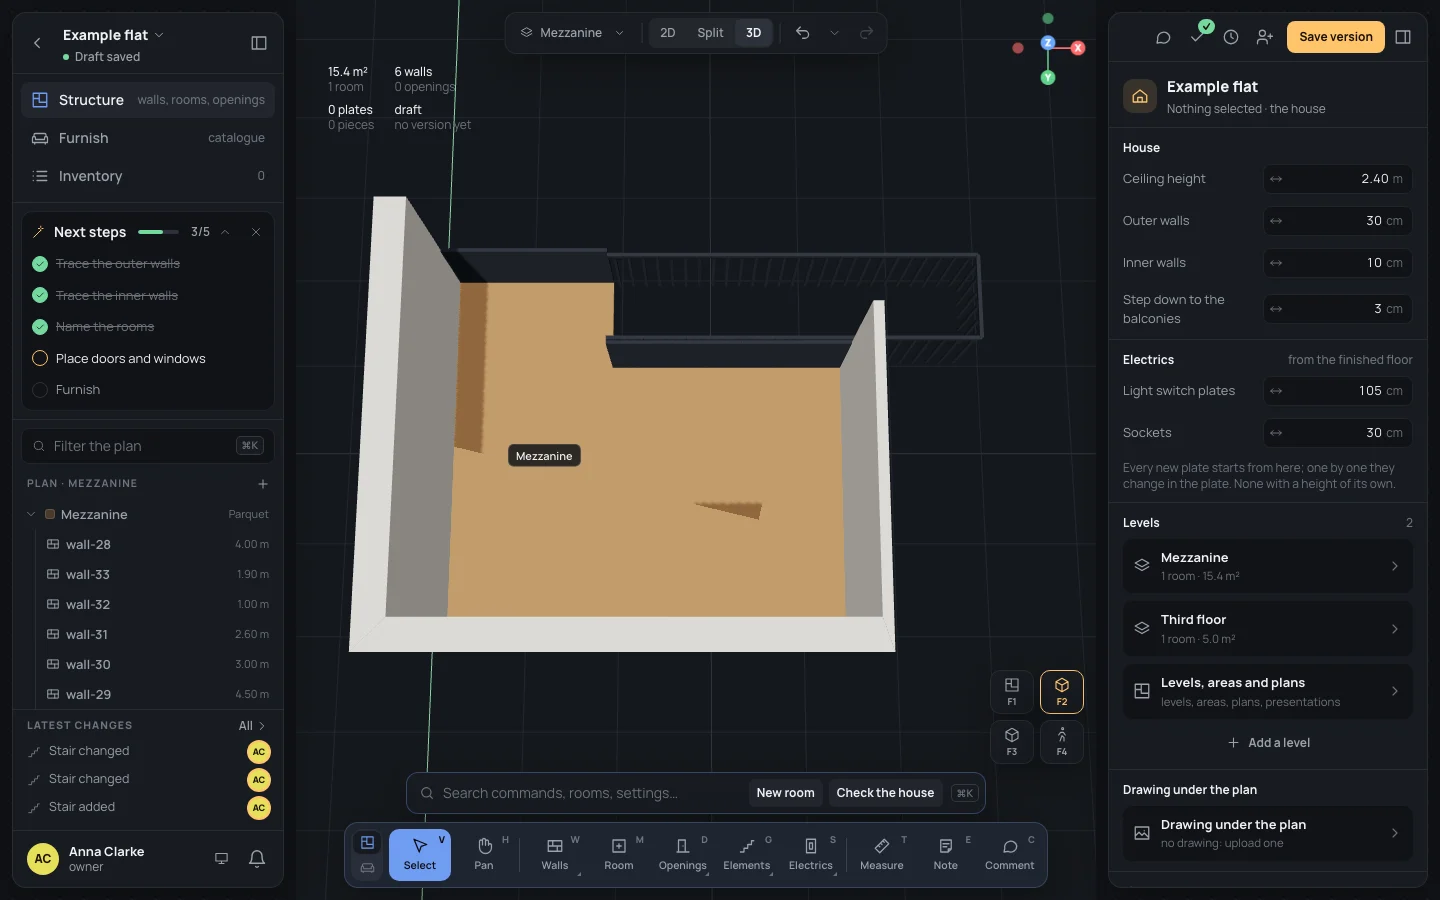
On Mezzanine, choose 3D and press F2F2, then drag downwards over the 3D to look from higher up. The mezzanine’s floor stops at its railings, with the opening the stair comes up through.
-
Choose Third floor with the Plan picker, press F2F2 and drag downwards again: the stair climbs along the living room’s south wall, and the balcony is outside the kitchen.
The last picture is the one at the top of this page. To see the levels from inside, the walk starts where the house sets it (The walk).
What can go wrong
Section titled “What can go wrong”- The Room tool makes nothing where you click: the walls there don’t close a region. On the example every region is closed; on your own plan, look for a gap (Room).
- The bar says No level above this one: you are on the mezzanine, the top level. Open Third floor first.
- The stair went the wrong way: it climbs from the first click to the last. ⌘ZCtrl+Z takes it away in one step; trace it again from beside the hall.
- The stair isn’t comfortable: you typed your own risers. Empty Risers to have them worked out.
- The balcony is level with the kitchen in 3D: its floor isn’t Outdoor, or Step down to the balconies is 0.
- Every change is one step: ⌘ZCtrl+Z takes it back, ⇧⌘ZCtrl+Shift+Zor⌘YCtrl+Y does it again.
See also
Section titled “See also”- Stairs and levels: the stair’s inspector, levels, plans and their structure.
- The Stair tool: stairs with turns and spirals.
- Rooms: a room’s use, floor and measures.
- The house’s settings: the step down and the house’s other measures.
- The plan and the 3D: moving round the 3D.