

Stairs and levels
A house can have more than one floor. Each floor is a level, each level has its plans, and a stair climbs from a plan to the level above. This page shows how to change a stair once it is drawn, and how to set up levels, areas, plans and presentations. To draw a stair, see the Stair tool.
The example home has two levels: Third floor at 9.00 m, and Mezzanine at 11.85 m above the kitchen. A straight stair along the living room’s south wall climbs from one to the other.
A stair’s inspector
Section titled “A stair’s inspector”Click a stair on the plan to select it. The inspector on the right shows it.
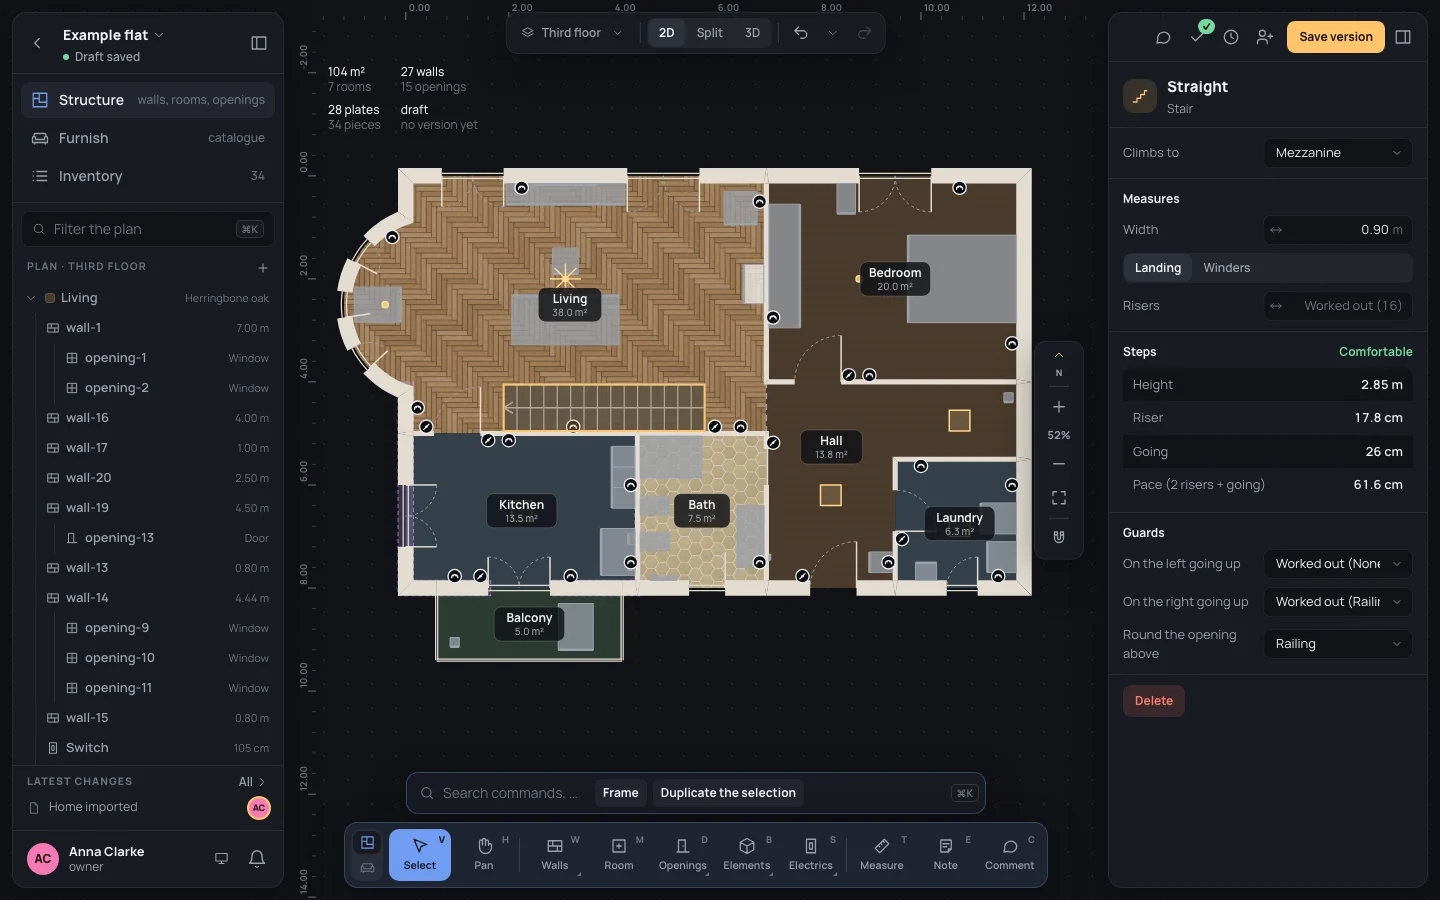
- The heading names the stair’s shape: Straight, L-shaped, U-shaped or Spiral. The shape comes from its walking line: two points make it straight, three make an L, four or more make a U. A spiral stays a spiral.
- Climbs to: the level it arrives at. The list only has the levels higher than the stair’s own. The height it climbs is the difference between the two levels’ elevations.
- Width (a stair with runs): how wide its steps are. Type it or drag the field. It must be more than zero.
- At the turns (a stair with runs): Landing puts a flat landing at each turn. Winders puts steps shaped like a fan there.
- Diameter (a spiral): the whole stair’s width across.
- Column (diameter) (a spiral): the post in the middle. It can be 0.
- Turn (a spiral): how far round it climbs, in degrees. Positive goes clockwise on the plan. It can’t be 0 or more than a whole turn (360°).
- Risers: how many risers. When the field is empty the stair works them out from the height: as few as keep each riser at 18 cm or less, shown as Worked out (16). Type a number (2 or more) to set your own. Empty the field to go back to the worked-out count.
Below the fields, the stair says what its measures make, in a list:
- Height: how far it climbs.
- Riser: the height of one step.
- Going: the depth of a step. On a stair with turns, it is the shortest one.
- Pace (2 risers + going): the length of one stride.
Guards
Section titled “Guards”Guards says what stops someone from falling off the stair’s sides, and off the edge of the hole on the floor above:
- On the left going up and On the right going up: Worked out, Railing, Low wall or None. Worked out puts a railing on a side that is free, and none on a side that runs against a wall (most of its length). The menu says what it worked out, like Worked out (Railing). A spiral’s inner side has its column, so it needs none.
- Round the opening above: Railing (as it starts), Low wall or None, around the hole in the floor above. The side the stair arrives by stays open.
Comfortable or not
Section titled “Comfortable or not”At the bottom, the stair says Comfortable in green, or what isn’t comfortable in red. A comfortable stair has:
- risers of 18 cm at most;
- goings of 22 cm at least;
- a pace between 60 and 66 cm.
The same warnings are in the house’s checks.
Try it on the example
Section titled “Try it on the example”- Select the stair along the living room’s south wall. It says Worked out (16): 2.85 m in 16 risers of 17.8 cm, goings of 26 cm, a pace of 61.6 cm, Comfortable.
- In Risers, type Risers
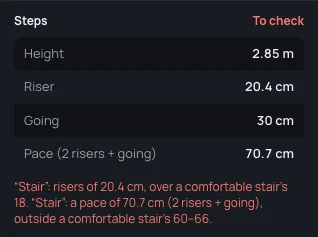
14and press ↵↵. Each riser is now 20.4 cm, and the stair says it is over a comfortable stair’s 18 cm, with a pace of 70.7 cm. - Empty Risers and press ↵↵, or press ⌘ZCtrl+Z: the 16 risers are back.
To move a stair, drag its walking line on the plan. To delete it, use Delete at the bottom of the inspector, or press ⌫⌫or⌦⌦ while it is selected. ⌘ZCtrl+Z brings it back.
What can go wrong
Section titled “What can go wrong”- Climbs to lists no level: the stair’s level is the highest. Add a level above it first (see below).
- You type a number of risers that isn’t a whole number, or is less than 2. The field says how many it takes and keeps the old value.
- A width or a diameter of zero, or a turn of 0° or more than 360°, is refused in the same way.
The levels
Section titled “The levels”When nothing is selected, the inspector shows the house. Its Levels group lists each level, the highest first, with how many rooms it has and their floor area.
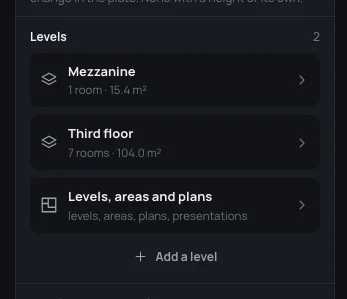
- Click a level, or Levels, areas and plans, to open the house’s structure page.
- Add a level opens A new level: its name (suggested Floor 2, then Floor 3, and so on, selected for you to type over), its Short name and its Elevation, suggested 3 m above the highest level. Add a level makes it; all of it can be changed later.
The search (⌘KCtrl+K) also opens the structure page: look for The house’s structure: levels, areas, plans, presentations.
The structure page
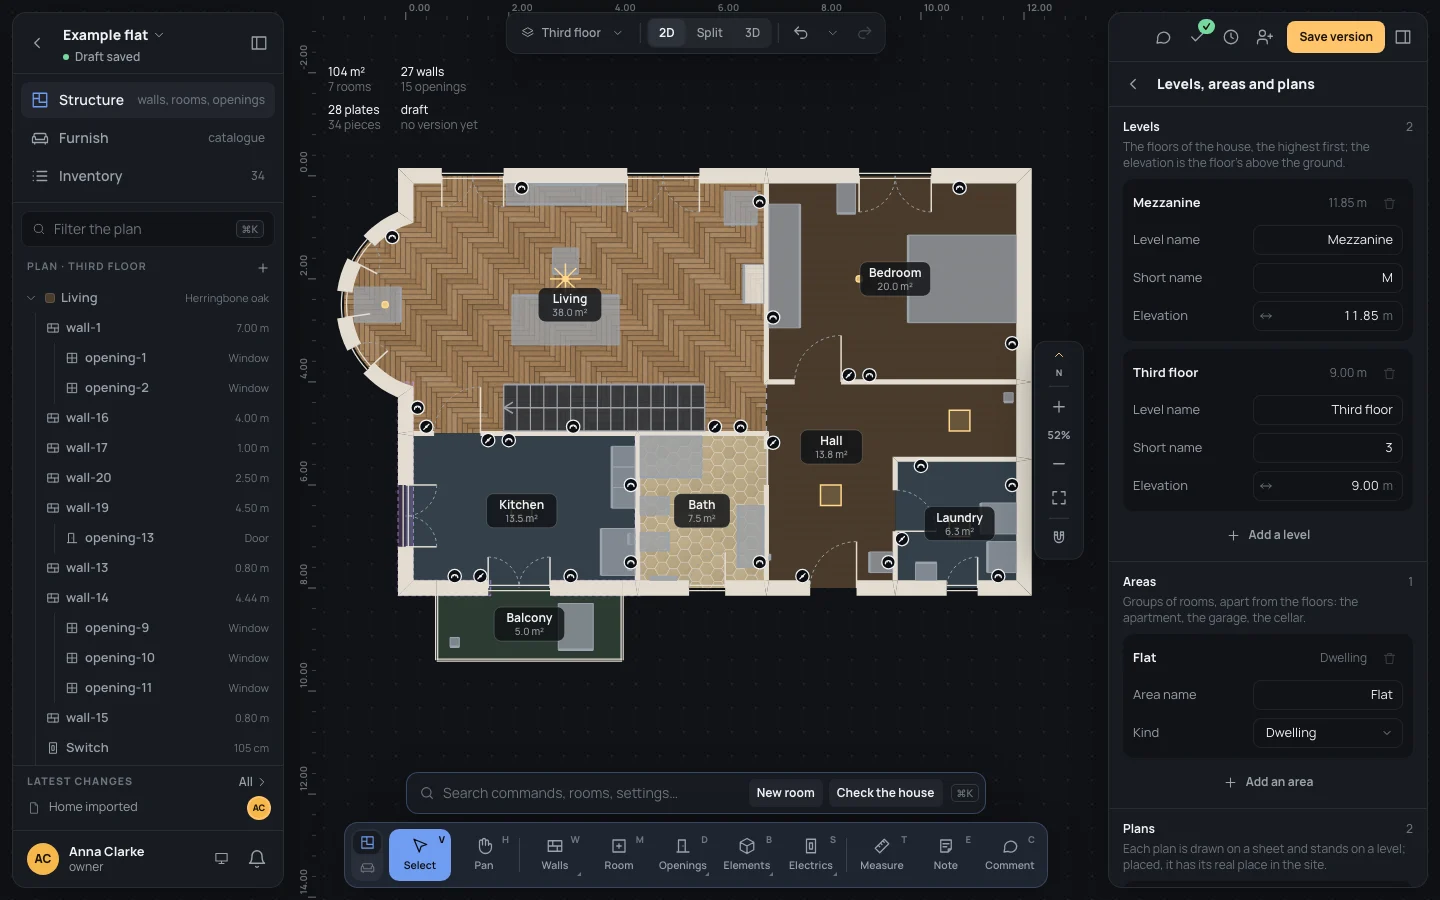
Section titled “The structure page”The page has four parts: Levels, Areas, Plans and Presentations. The arrow at the top takes you back to the house.
Levels
Section titled “Levels”The floors of the house, the highest first. Each one has:
- Level name: what the editor and the dashboard call it. It can’t be empty.
- Short name: what a lift’s button would show, like 3 or M.
- Elevation: the height of its floor above the ground. It can be below zero, for a cellar: type
Elevation
-3.
Add a level works as in the house’s inspector. The bin beside its name (Delete the level) is greyed out when the level can’t go, and says why when you point at it: plans stand on it, a stair climbs to it, or it is the house’s only level.
An elevation that would make a stair climb down is refused: At this elevation a stair would climb down instead of up.
Groups of rooms that don’t depend on the floors: the apartment, the garage, the cellar. The example home has one area, Flat, a Dwelling.
- Area name, and Kind: Dwelling, Garage, Cellar, Outdoor or Zone.
- Add an area adds Area 2 (then 3…), of the kind Zone.
- The bin beside its name (Delete the area) is greyed out while rooms belong to it, or when a presentation shows only that area.
Each plan is drawn on a sheet and stands on a level. The plan picker at the top of the plan switches between them. Here each plan has a card:
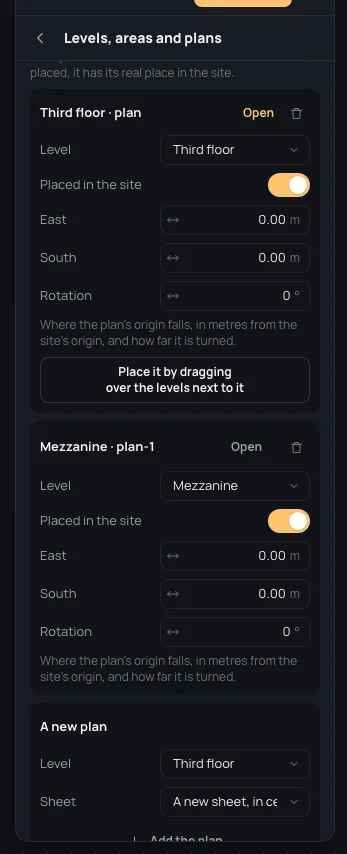
- Its name is its level’s, followed by the plan’s id. Open opens it. The plan you are on says it is open.
- Level: the level it stands on. A change that would make its stairs climb down is refused, with the reason.
- Placed in the site: the plan has a real place. East and South say where the plan’s origin falls, in metres from the site’s origin. Rotation says how far it is turned, in degrees, clockwise seen from above. A plan not placed can only be shown arranged (see Presentations). You can’t take it out of the site while a presentation shows it in its real place.
- Place it by dragging over the levels next to it: only on the plan you are on, once it is placed, and when there is another level to see under or over it.
- The bin beside its name (Delete the plan): greyed out when it is the house’s only plan.
Placing a plan by dragging
Section titled “Placing a plan by dragging”- Open the plan to place, here the mezzanine’s. Its card has Place it by dragging over the levels next to it.
- Click it. The bar at the bottom says Place the plan, and the other levels show through.
- Drag the plan. Its corners catch the corners of the levels next to it.
- Fine-tune it with ←← →→ ↑↑ ↓↓: 1 cm each, 10 cm while you hold ⇧Shift.
- Press ↵↵ or EscEsc to finish.
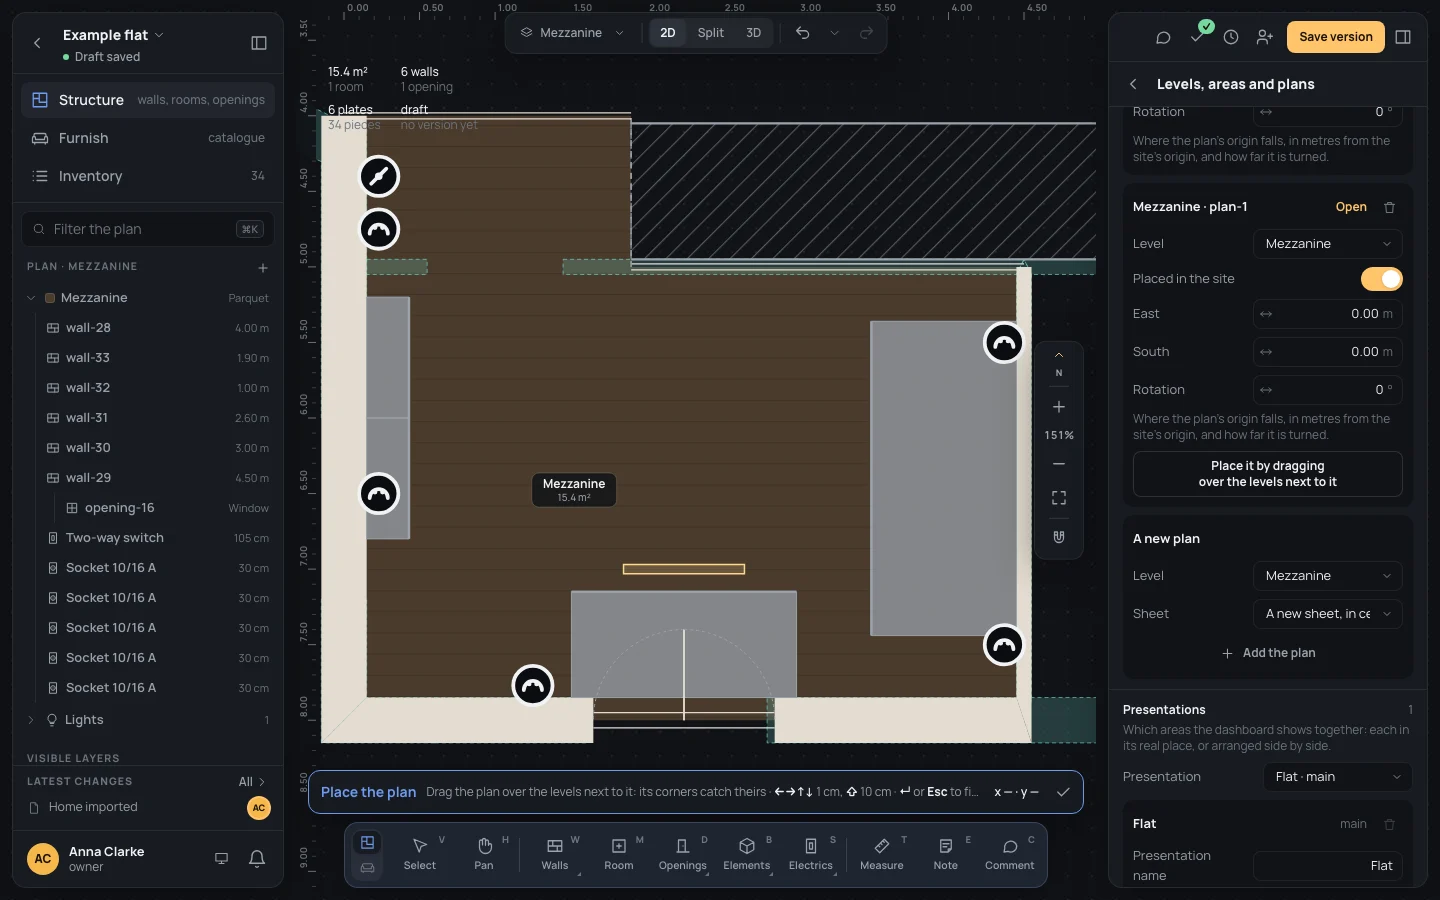
Each drag is one step: ⌘ZCtrl+Z puts the plan back where it was.
A new plan
Section titled “A new plan”At the end of Plans, A new plan has two choices:
- Level: the level it stands on (the open plan’s, at first).
- Sheet: A new sheet, in centimetres, to draw from measurements, or the sheet another plan already uses, to trace the same drawing.
Add the plan makes it and opens it at once. It starts with the open plan’s heights.
Presentations
Section titled “Presentations”A presentation says which areas the dashboard shows together, and how: each in its real place, or arranged side by side. The first one is the main one: it is shown when nothing else is chosen, and it holds where the walk starts.
- Presentation: which one you are changing. The main one says · main after its name.
- Presentation name: its name. It can’t be empty.
- How it shows them: In their real place or Arranged.
- Areas shown: a box for each area. A box you can’t change is greyed out, and says why when you point at it.
- When it is Arranged, each area shown has two more fields, Flat: east and Flat: south, the distance in metres it is moved from its real place.
- Duplicate makes a copy, called like the first with (copy). Make it the main one puts it first. Delete the presentation is greyed out on the house’s only presentation.
A change it couldn’t be shown with is refused, in red under the areas:
- It must show at least one area.
- A plan that isn’t placed in the site can only be arranged.
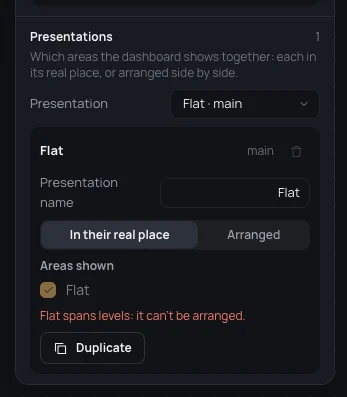
- An area that spans levels can’t be arranged.
- A plan with rooms of two areas shown: each area must move on its own.
On the example, choose Arranged for the presentation Flat: it says Flat spans levels: it can’t be arranged., since the flat has rooms on the third floor and on the mezzanine.
The example’s mezzanine
Section titled “The example’s mezzanine”Open the mezzanine with the plan picker at the top. Its plan shows the level below seen through, faintly, so you can draw over it. Other levels, in the left panel’s Visible layers, hides or shows them.
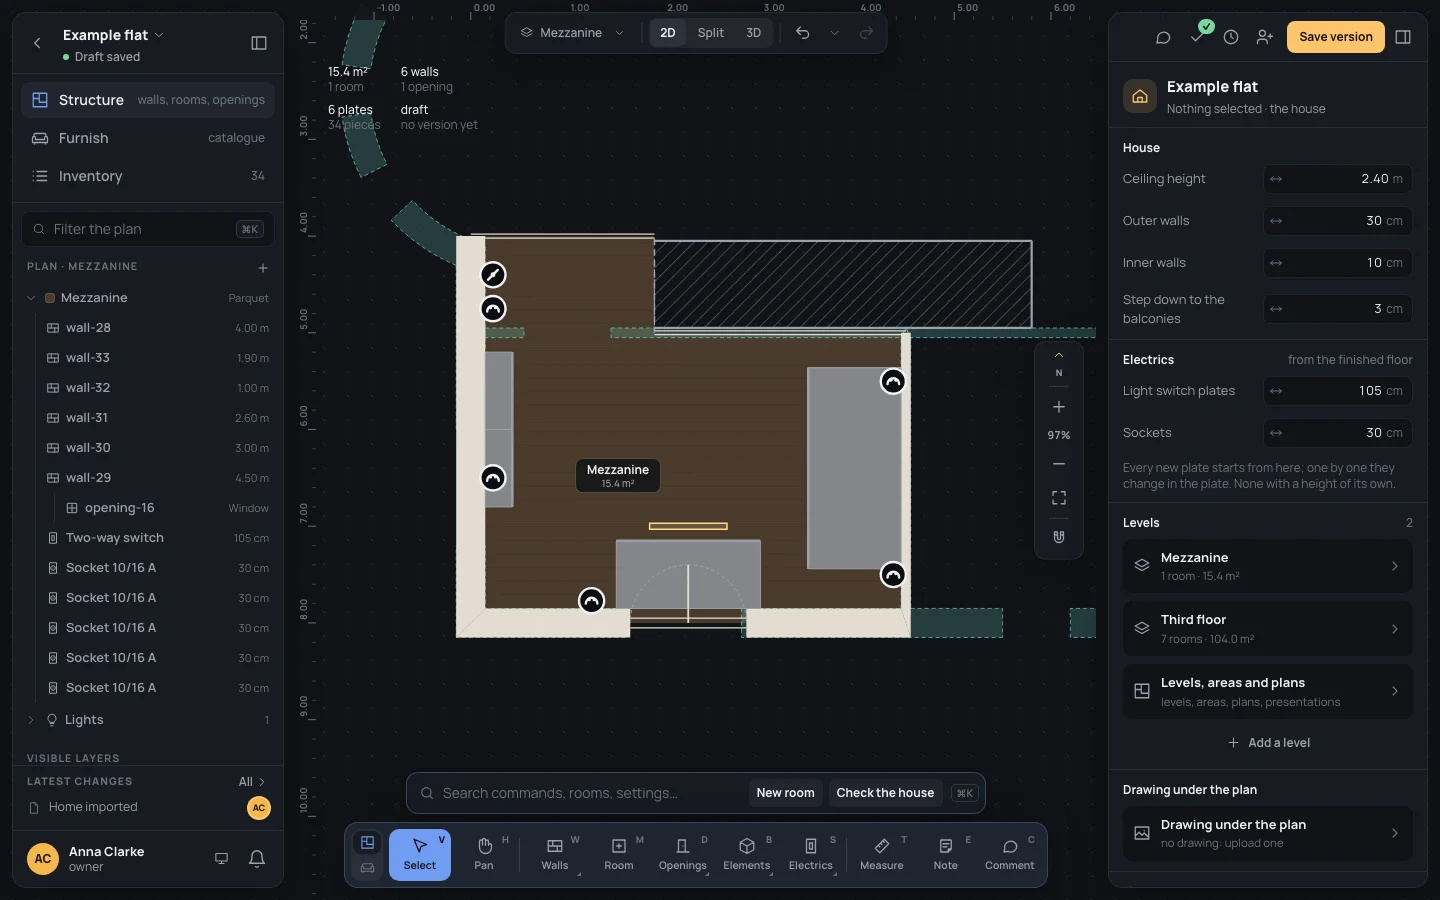
- Open the house’s structure page from the inspector, with nothing selected.
- In Levels, the Mezzanine stands at Elevation
11.85m, 2.85 m above the Third floor at 9.00 m. - In Plans, the mezzanine’s plan stands on Mezzanine, on a sheet of its own, placed at 0.00 m east, 0.00 m south and 0°, like the third floor’s: one is exactly above the other.
- The stair on the third floor climbs to Mezzanine. Change the mezzanine’s elevation to
Elevation
12.15: the stair now climbs 3.15 m, and works out 18 risers. Press ⌘ZCtrl+Z to go back.
Undoing
Section titled “Undoing”Every change on this page is one step: ⌘ZCtrl+Z undoes it, ⇧⌘ZCtrl+Shift+Zor⌘YCtrl+Y does it again. Deleting a level, an area, a plan or a presentation that something still needs is never possible: the button is greyed out until nothing does.
See also
Section titled “See also”- The Stair tool: drawing a stair, straight, with turns or spiral.
- Checks: uncomfortable stairs among the house’s problems.
- Plan and 3D: seeing the levels in 3D.
- Glossary: level, area, plan, sheet, presentation.