

A new home
A new project opens on a wizard that sets the house up before you draw: one question at a time on the left, what your answer does to the house drawn large on the right. Every step but the first can be left for later and changed whenever you like.
How it works
Section titled “How it works”The wizard opens in a large window over your projects when you start a new house: after New project, the New house tile or one of the ways to Start a house (that one already chosen). The house is yours alone while you set it up, and becomes a project, on your list and in its editor, when you finish.
- The steps, in the column on the left: Start, Where, Levels, Drawing, North, Measures, Openings, Ready. The one you’re on is amber, the ones done have a green tick, the ones left for later say later. A click on a step takes you there. Starting from a blank sheet, Drawing says not needed and is passed over. On a tablet held upright and on a phone the steps are a strip at the top, over the preview.
- Back goes to the step before, Later leaves this one for later (not on Start and Ready), Next keeps what you chose and goes on. ↵↵ goes on too, from the house’s name or outside the fields; in a field, ↵↵ keeps the value and you stay.
- Leave, I’ll resume later, at the bottom of the column of steps (the ✕ at the end of the strip, on a phone), or EscEsc outside the fields, or a click outside the window, takes you back to your projects and says The house waits for you: resume it from your projects. What you choose is kept: the step you were on, where the house starts from, the steps done and those for later, and what you hadn’t confirmed yet too (the name you were typing, the points clicked on the drawing, the windows ticked), in this browser.
Everything the wizard does to the house is a change like any other: once in the editor, ⌘ZCtrl+Z takes it back, and the people in the project see it.
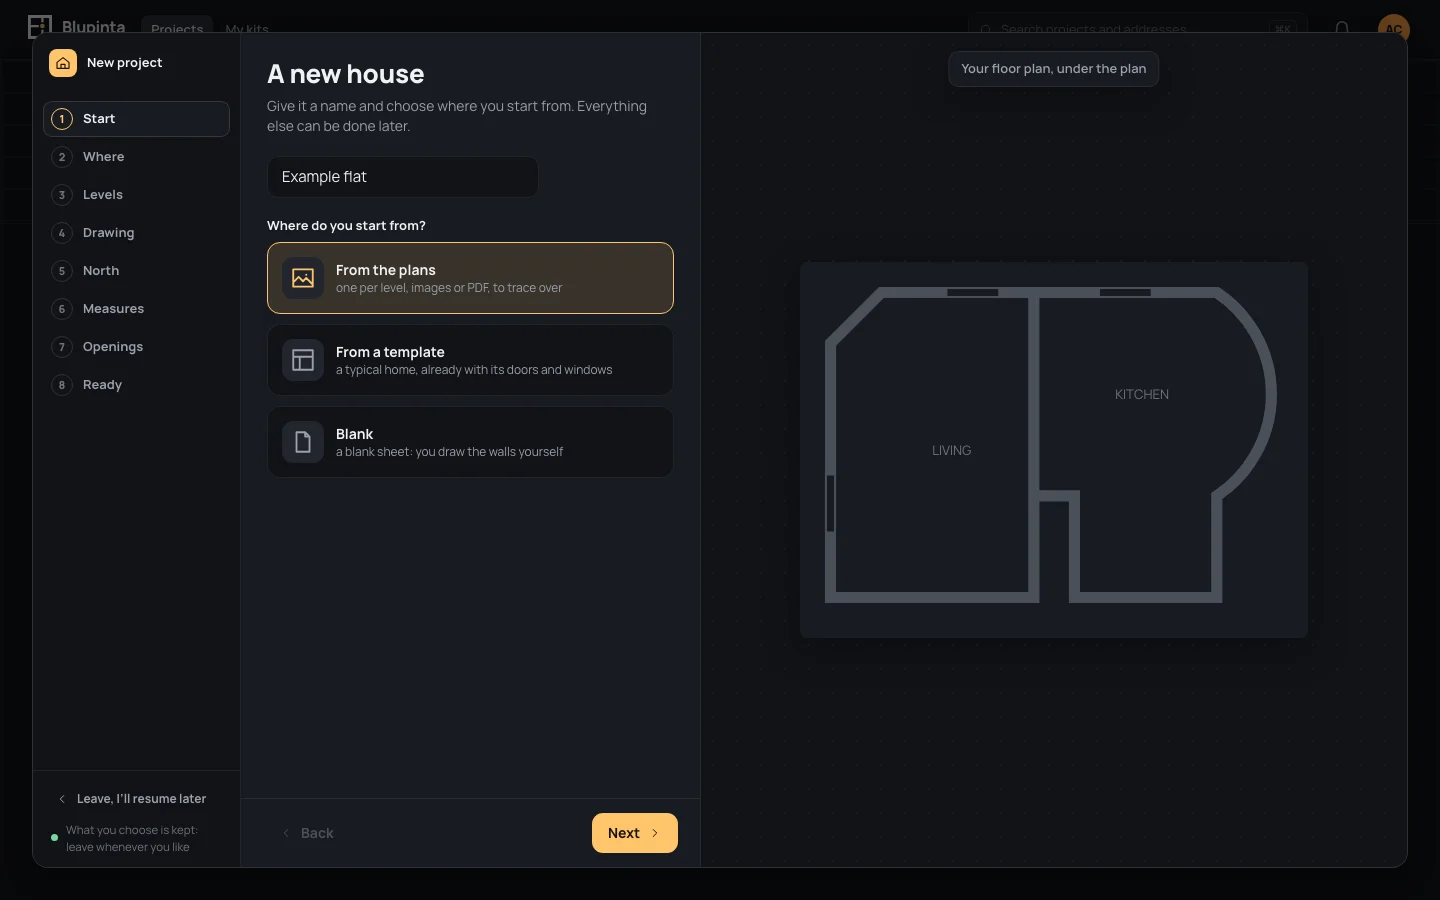
Give the house a name in House name (What shall we call it?): it becomes the project’s name too. Then Where do you start from?
- From the plans: upload an image or a PDF and trace over it. The wizard asks for the drawing and puts it to scale.
- From a template: a typical home, already drawn, with its doors and windows, to fit to your measures afterwards. Choosing it opens Templates in the preview’s place: twelve homes, flats from a studio to a duplex, houses from an L-shaped one with a garden to a four-level farmhouse, two a row, each with its area, bedrooms and levels. Narrow them by Kind (Flats, Houses), Bedrooms, Levels and what is Outside (Garden, Terrace, Balcony, Porch); the count says how many are left, Clear the filters shows them all. A click chooses one and draws it on the right, level by level, its rooms named with their area. Change opens them again. Next draws the template into the house, in one step: its levels, walls, rooms, stairs, doors and windows; the house keeps its own name. Gardens, porches and trees are only in the template’s drawing and round the house in the 3D of its levels, for the look, for now. A house that already has something drawn doesn’t take a template. Doors and windows take the types you choose in the Openings step.
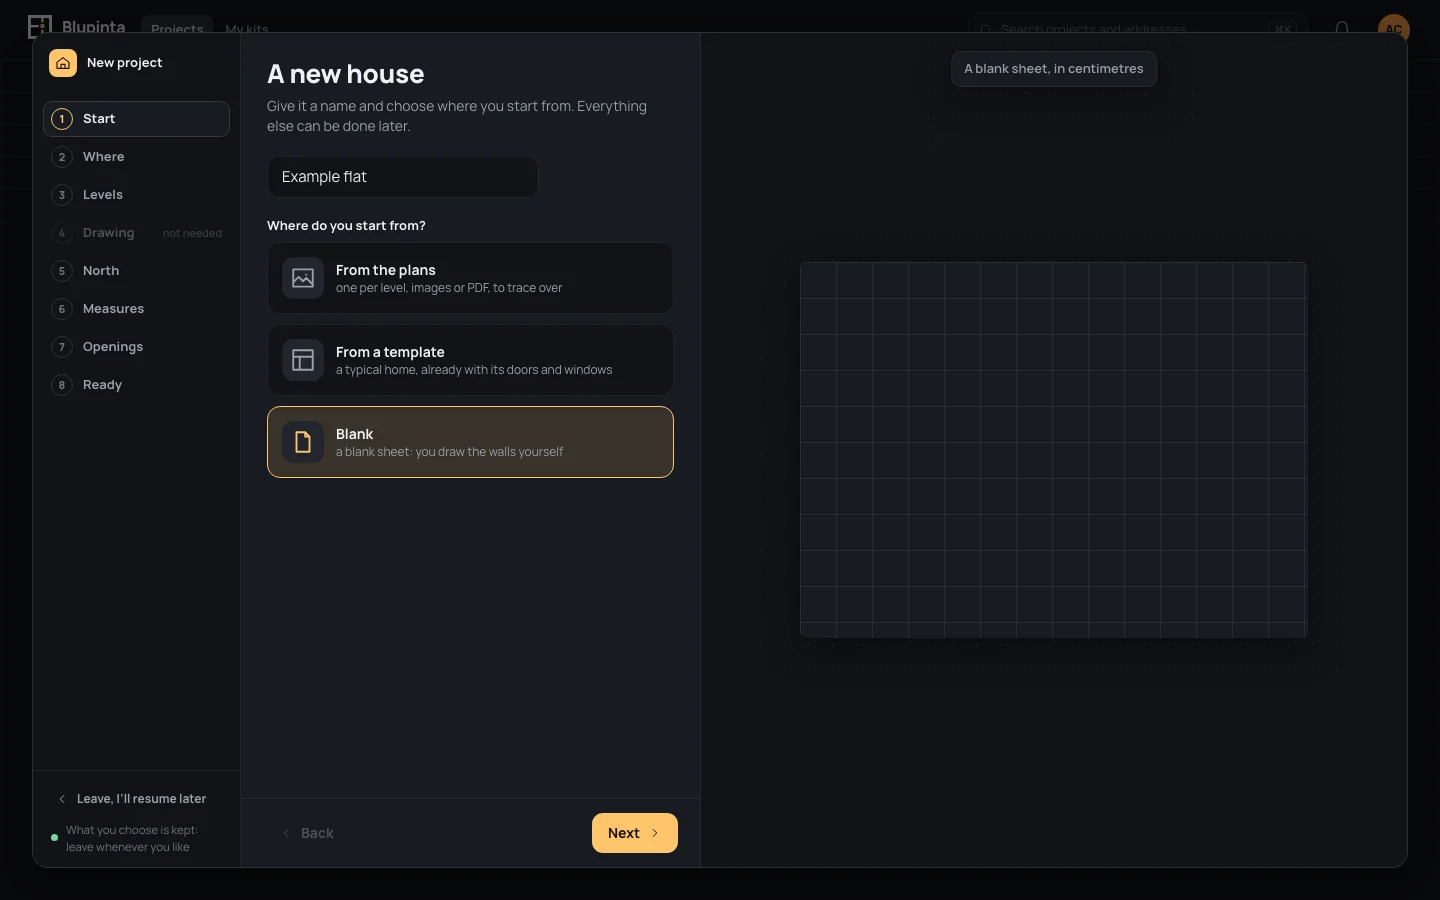
- Blank: a blank sheet in centimetres, the walls drawn by you. The drawing’s step is passed over; north isn’t, as the sun needs it.
A house exported from another project (Export the home (.json)) opens in the editor, with Import a home… in the project’s menu.
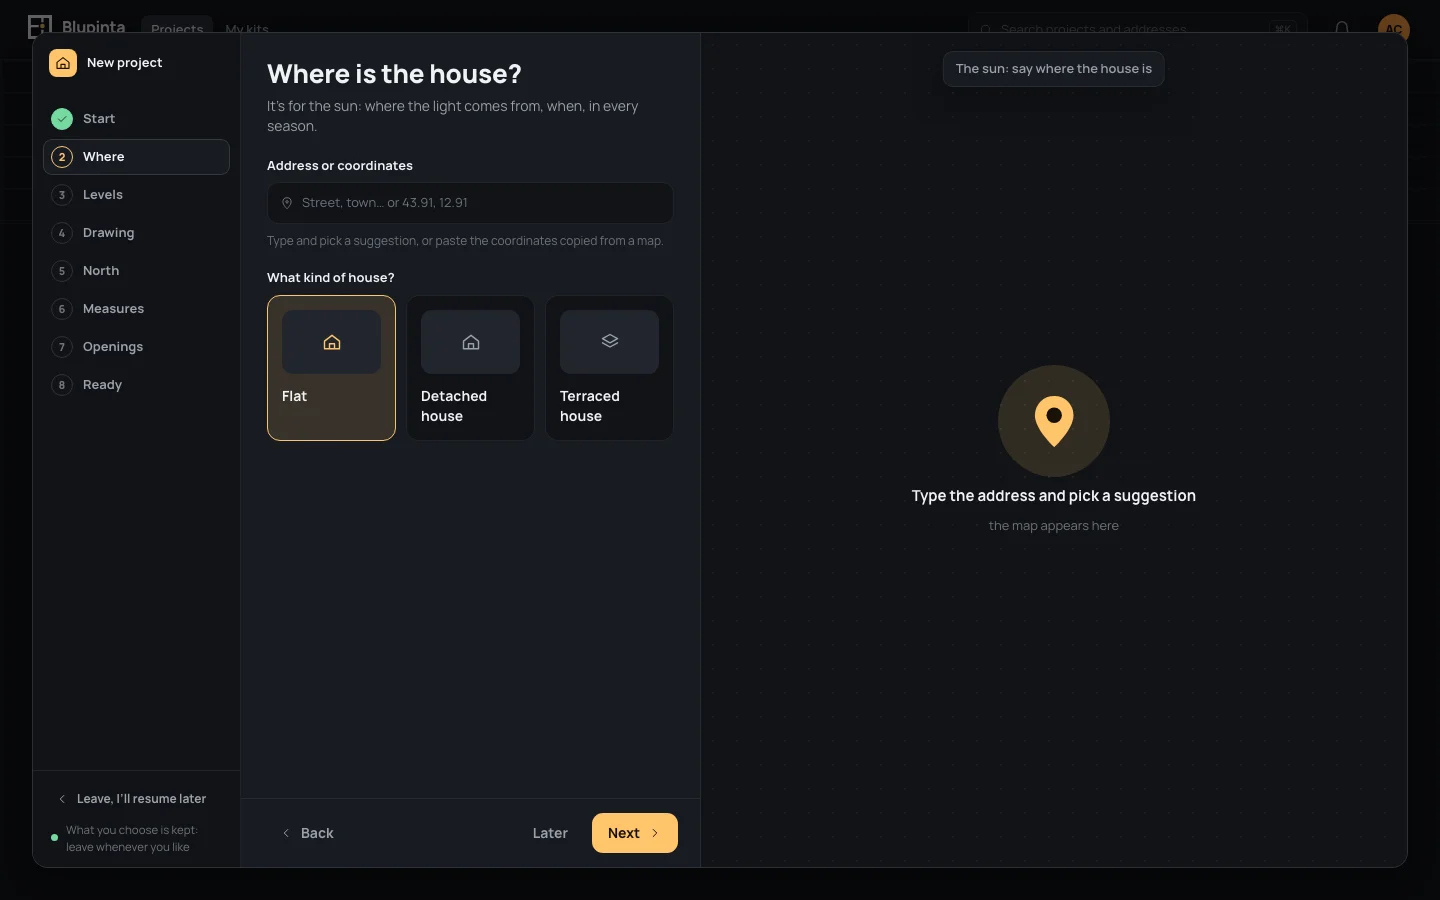
Where is the house? It’s for the sun: where the light comes from, when, in every season.
- Address or coordinates: one field. Type the address: places matching it are suggested under it (Suggestions from Google Maps); take one with ↑ ↓ and ↵↵, or a click, and the house is placed there. Or paste the coordinates a map copies (45.07, 7.69) and press ↵↵: the house is placed, its address left as it was. An address typed by hand is kept when you press ↵↵ or leave the field. Under the field, where the house is (45.07° N · 7.69° E · drag the pin to refine), or what to do to place it.
- What kind of house?: Flat, Detached house or Terraced house.
On the right, a big pin until the house has a place; then the map around it, with the house under the pin in its middle. Drag the map to move the house under the pin: on release it stays there, one step. Zoom in and Zoom out at the map’s corner. The map is Google’s, drawn by Blupinta’s server (your browser never reaches Google); without it, the pin stays on a plain ground and the card says The map isn’t answering. Over the map, when the sun rises and sets there today (The sun in …: sunrise 07:34 · sunset 18:59, the place being the last part of the address, or The sun at the house: … with no address). Latitude and longitude one by one are in the house’s settings (House settings).
For the example: paste Address or coordinates45.07, 7.69 and choose Flat.
Levels
Section titled “Levels”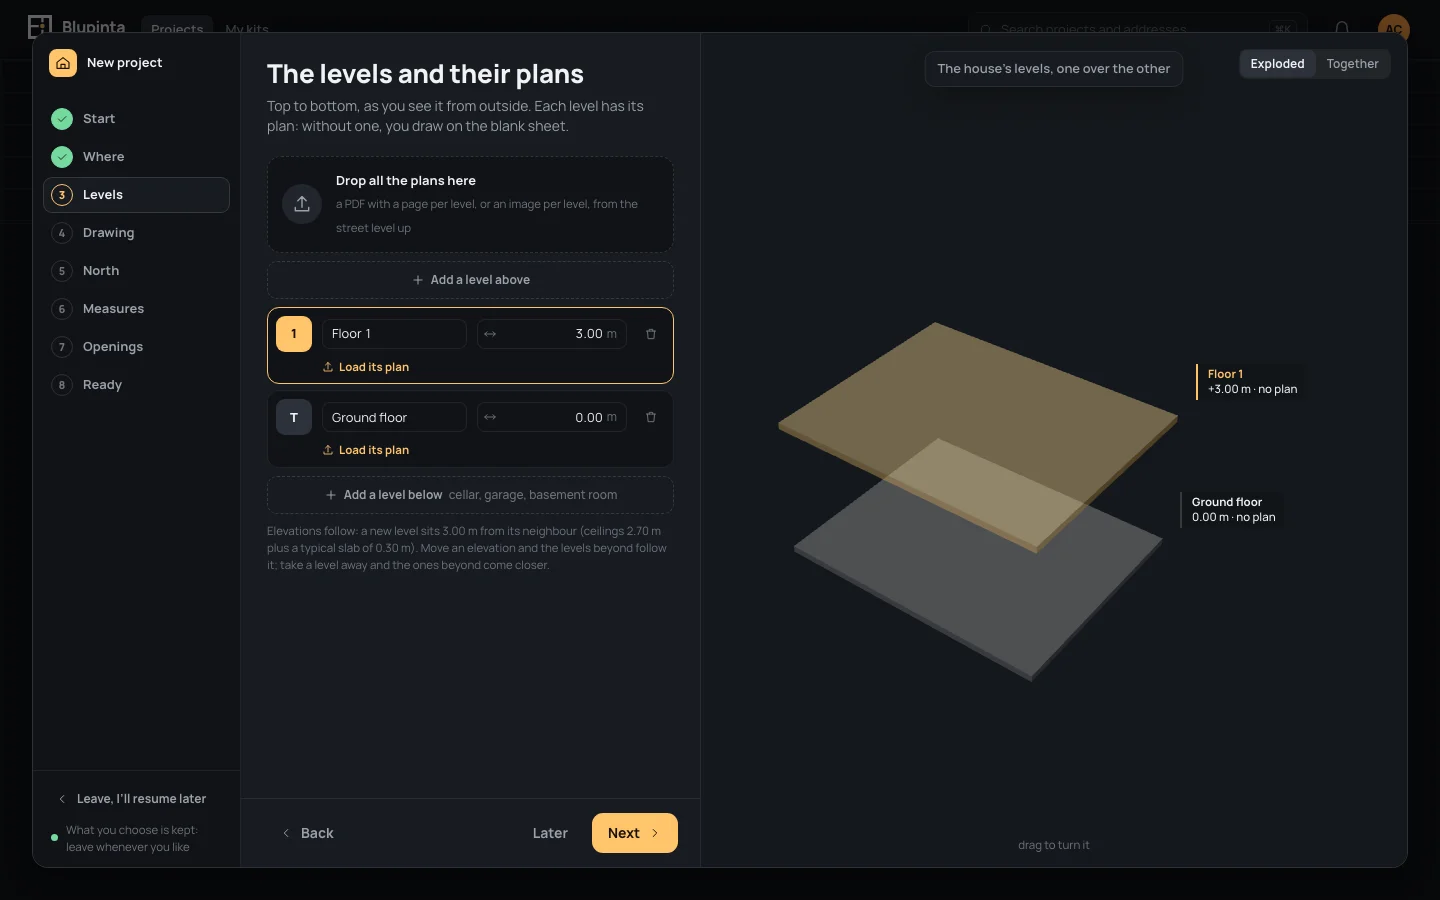
The house’s levels, from the top down as you see it from outside, and on the right the same levels in 3D, one over the other: Exploded spreads them apart, Together stands them as they are; drag to turn them. The level you’re on is lit in amber, here and there; the one under the pointer, in blue. From a template, the step is The template’s levels: its levels are there, each with its plan drawn; you can add or remove levels, and load your own plan under each to trace.
- Add a level above puts a new one over the highest, named Floor 1, then Floor 2 and on; Add a level below one under the lowest, Cellar first, then Basement 2 and on. A new level stands a ceiling and a typical slab (30 cm) from its neighbour, as the note under the list says.
- Each level has its name and the elevation of its floor, in metres, typed or dragged by its ↔. Moving one carries along the levels beyond it (above it, or below it when it is under the street): moving Floor 1 up 20 cm takes Floor 2 up as much. A level can’t pass the one beside it, nor make a stair go down.
- The bin takes a level away, and the levels beyond come closer, the next one to where it was; Undo, in the line that says so, brings it back. A level with something drawn on it, one a stair climbs to, or the only one, can’t be taken away here (its bin says why): that is done in the editor.
- Load its plan: each level has a drawing of its own, under its plan. change puts another in its place, remove takes it away. Starting from the plans, Drop all the plans here takes them at once: a PDF with a page per level, or an image per level, from the street level up; a page or image more than the levels adds a level above.
Later, in the editor, levels are changed in Stairs and levels. For the example: Add a level above once, for the mezzanine.
The drawing
Section titled “The drawing”Upload the floor plan, then put it to scale: click two points on it whose real distance you know, and type it.
- Drop the image or the PDF on Drop the image or the PDF here, or click it to choose it (JPG, PNG, PDF). A PDF asks first which page, and at what resolution. The file then shows its name and size in pixels; Another one puts a different file in its place.
- 1 · Click two points on the drawing: click point A, then point B, on the large drawing on the right (the caption on top says which one). The chips Point A and Point B light up; Redo clears them.
- 2 · How far apart are they?: type the real distance in Distance and press ↵↵; once typed, it can be set by dragging the ↔ too. The dashed line between the two points says it.
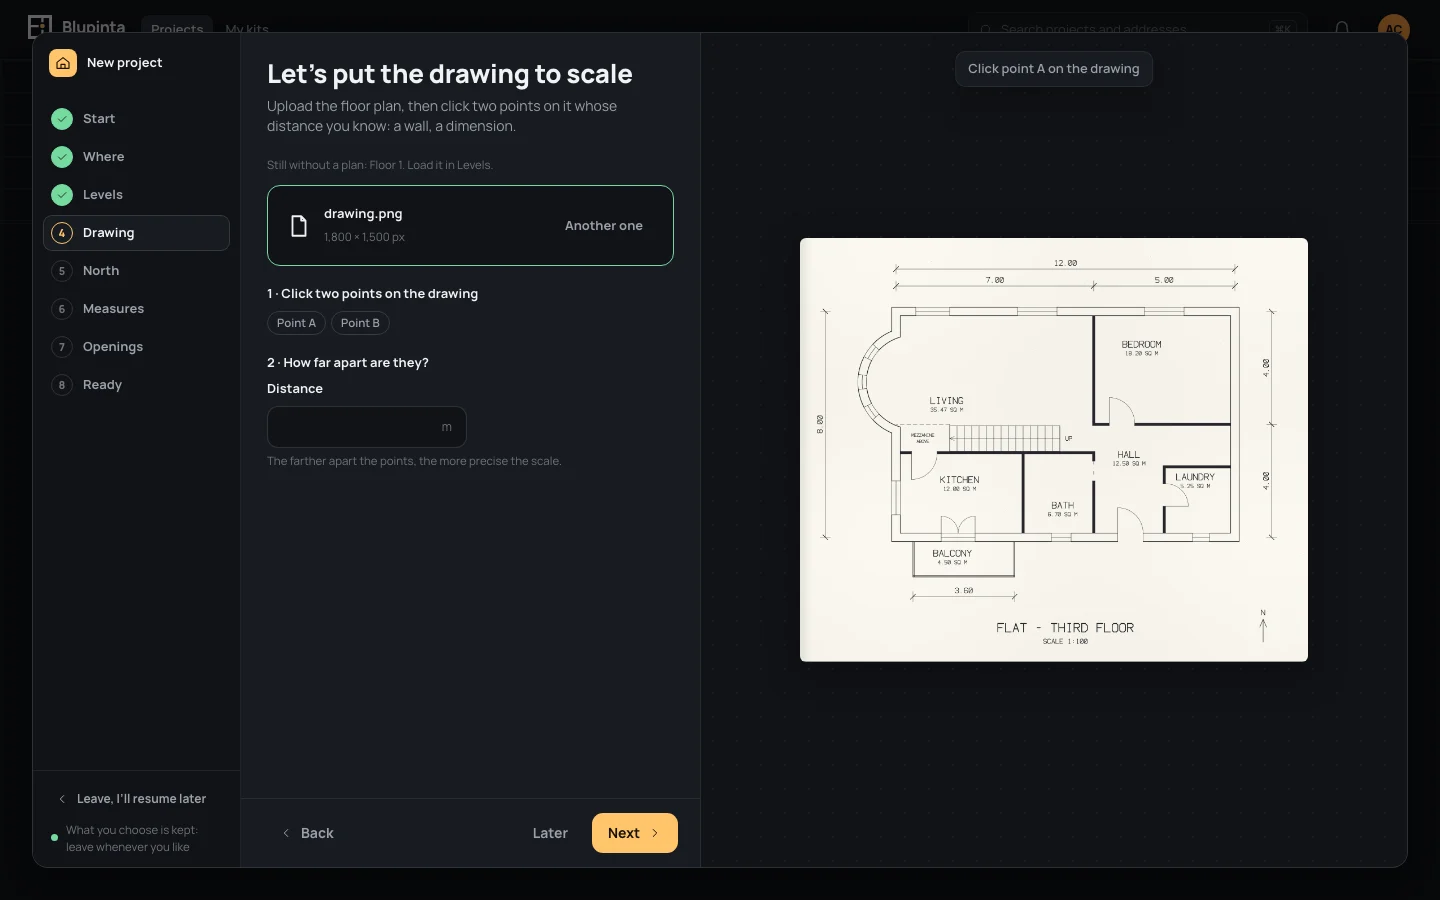
On the example’s drawing, click the two ticks at the ends of the 12.00 dimension, over the north wall, and type
Distance12. The wizard says To scale: 1 m = 100 units. Check a dimension you know: does it
match?: the 7.00 and 5.00 under it should now measure what they say.
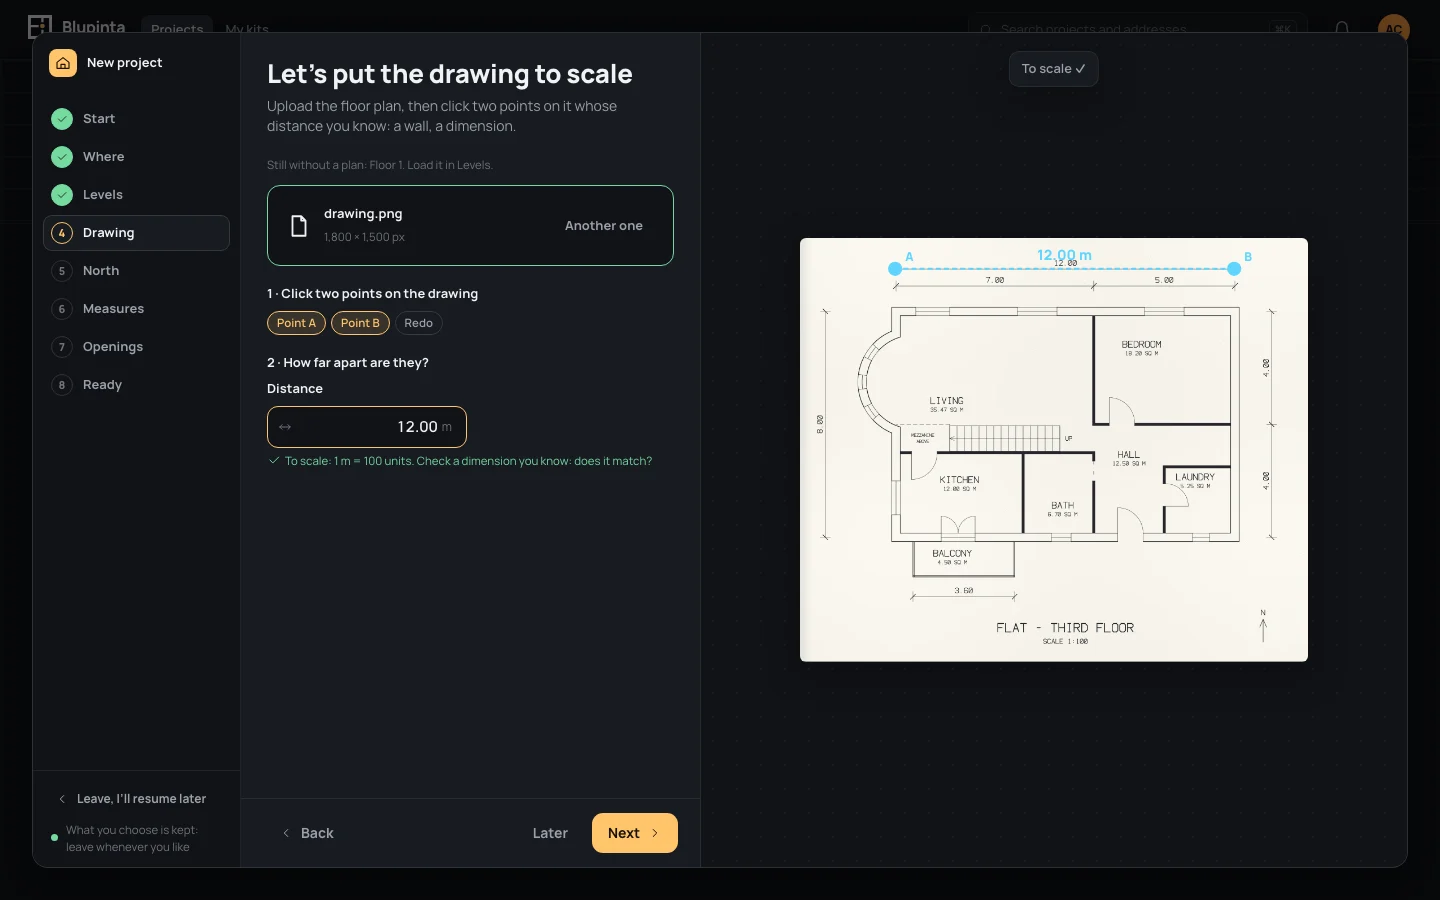
The farther apart the two points, the more precise the scale: a whole wall’s dimension beats a door’s. A distance that isn’t a length says Type a length, for example 30 or 2.40. Clicked the wrong place? Redo, and click again. You can put the drawing to scale again at any time, in the editor (The drawing under the plan).
A plan per level
Section titled “A plan per level”With more levels than one, each with its plan (given in Levels), a row of tabs over the file says which level’s drawing is open: each is put to scale on its own. A level still without a plan is named under the tabs (Still without a plan: …); its plan is loaded in Levels.
On a level above the street with a level below it that has a drawing (or a level under the street with one above it), How it goes to scale offers Two points and a length, as above, or Like that level: click point A on this plan, then the same point A on the other, then B on each, on the two drawings side by side (the caption and the name in amber say which). The plan turns and moves so the two points fall on the same places as on the other level, one step: Aligned with …. A plan already to scale keeps its scale; one that isn’t takes the other level’s, measured between the two points. Pick points that don’t move from one level to the next: a corner of the outer walls, the edge of a stair, a lift shaft.
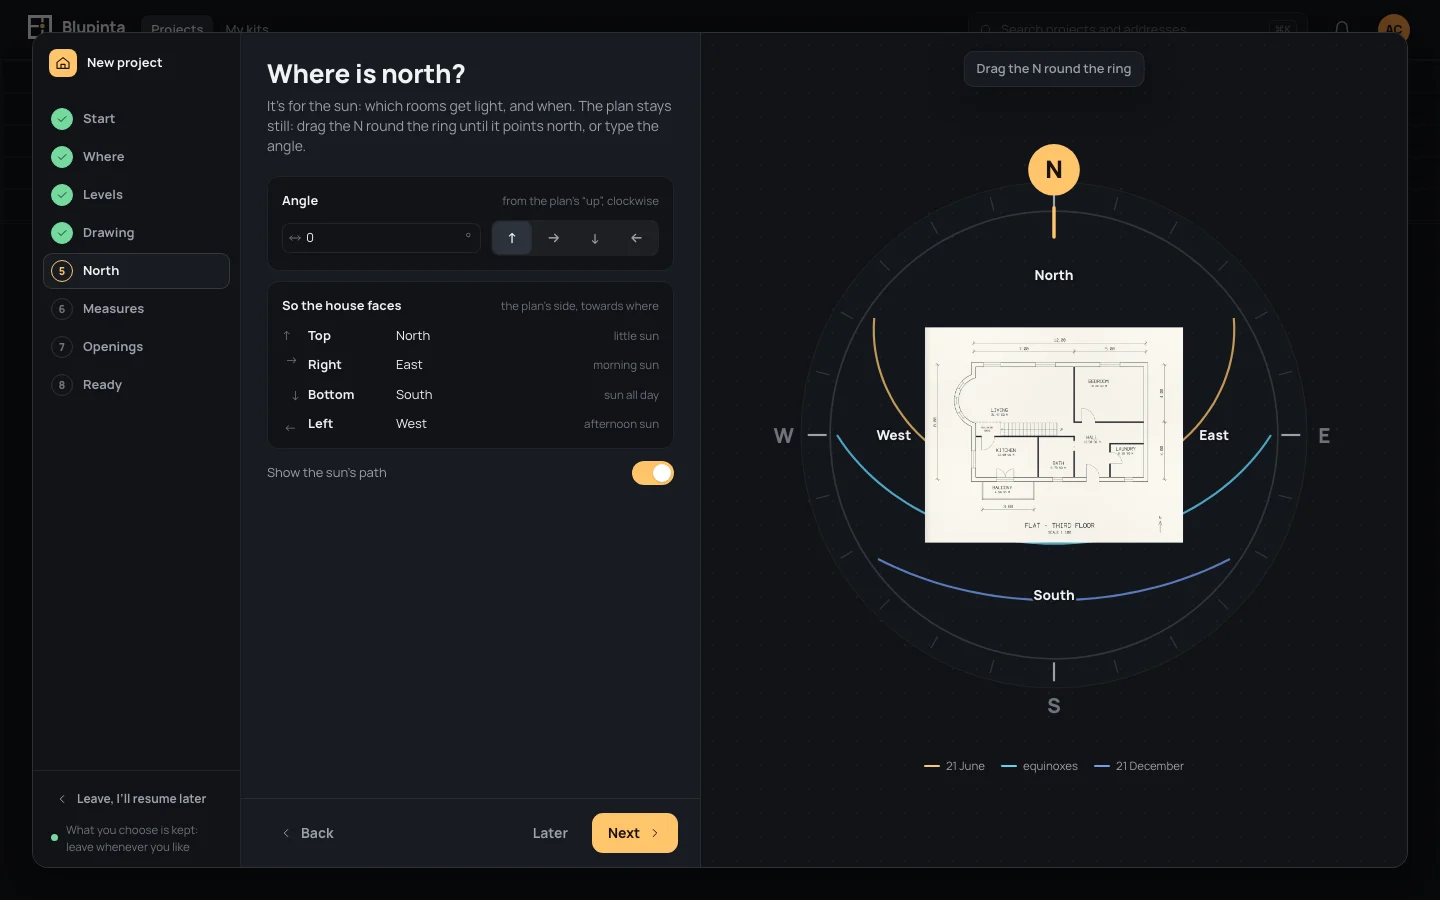
Where is north? It’s for the sun: which rooms get light, and when. The plan stays still inside a compass ring:
- Drag the N round the ring until it points north on the drawing. Near one of the plan’s four sides it is pulled onto it; hold ⇧Shift to leave it free.
- Or type the Angle, from the plan’s “up”, clockwise, or drag the ↔ beside it; or choose one of the four ways beside it (↑ → ↓ ←).
So the house faces says, for each side of the plan (Top, Right, Bottom, Left), where it faces (North, South-east…) and when it has sun (sun all day to the south, little sun to the north). The same words are written on the plan’s sides. Show the sun’s path draws over the plan the sun’s way across the sky on 21 June, at the equinoxes and on 21 December, seen from above, at the house’s latitude (until it has one, the middle of Italy’s), turned with north.
The example’s drawing is drawn with north up: leave it at 0°. North is always asked, from a blank sheet too: the compass then turns round an example plan.
Measures
Section titled “Measures”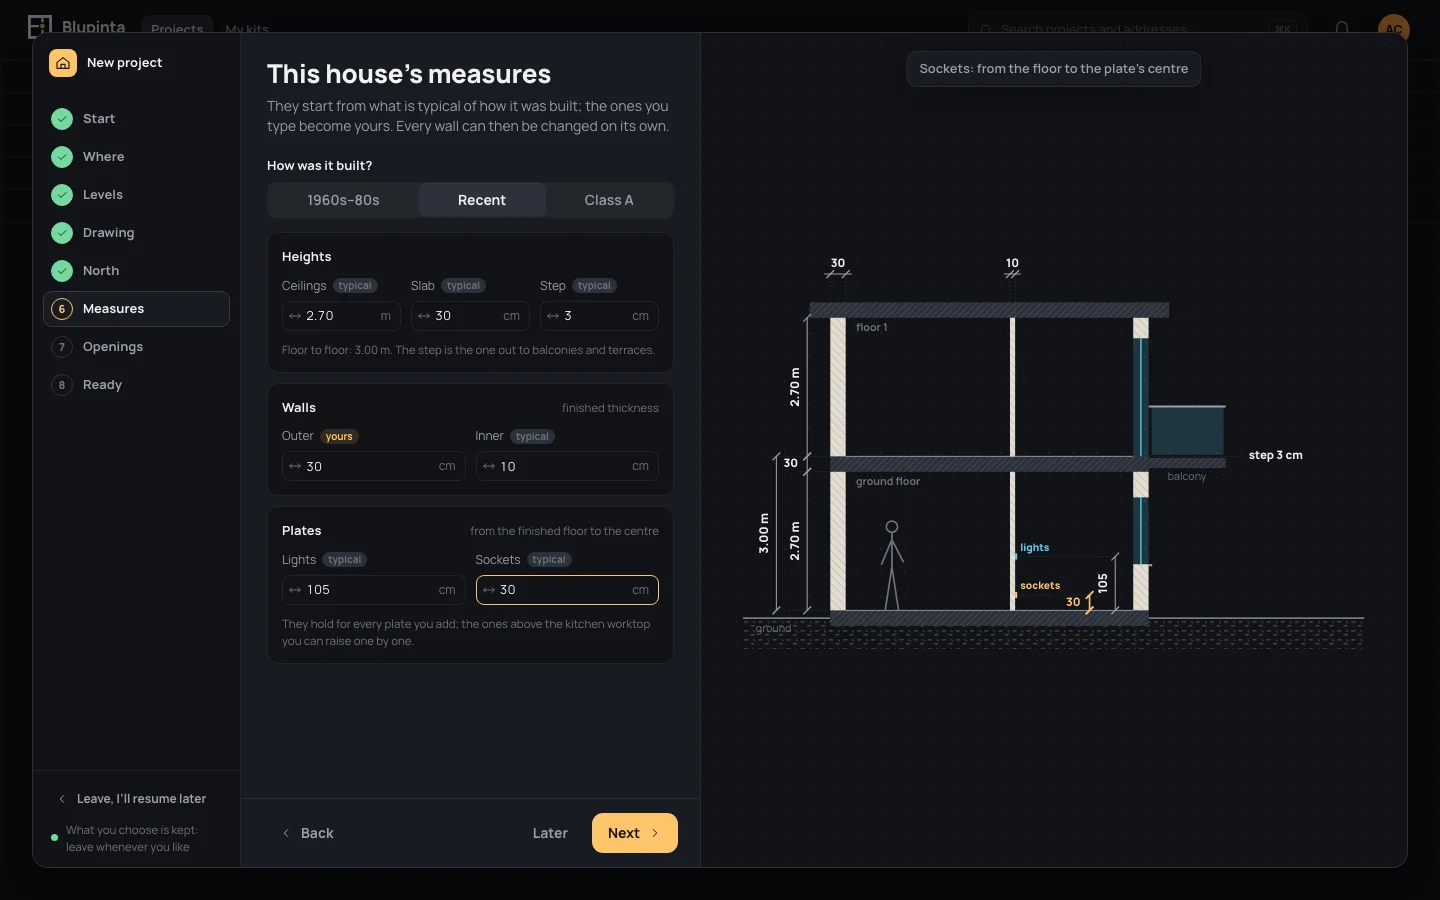
They hold for the whole house: every level, and every wall you draw starts from them; walls can always be changed one by one.
- How was it built?: 1960s–80s, Recent or Class A puts in every measure you haven’t typed the one typical of such a house (ceilings 2.90, 2.70, 2.70 m; slab 30, 30, 35 cm; outer walls 35, 40, 48 cm; inner walls 12, 10, 10 cm). They are assumptions, and each says so.
- Heights: Ceilings, from the finished floor to the ceiling; Slab, the thickness between one floor and the next; Step, how far a balcony or terrace is below the floor inside. Under them, Floor to floor: the ceiling and the slab, how far a level stands from the next (Levels).
- Walls, their finished thickness: Outer and Inner. The inner walls’ thickness is also what the wall tool draws with next.
- Plates, from the finished floor to the centre: Lights (the light switches) and Sockets. They hold for every plate you add; the ones above the kitchen worktop you can raise one by one (Switches and sockets).
Beside each measure, typical (an assumption: hold the pointer over it to read whose) or yours, once you have typed it: a measure you typed stays when you choose another way it was built. Type one and press ↵↵, or drag the ↔ beside it. The house in section on the right follows as you type: the measure in hand is dimensioned in amber, and named over the section. A measure of zero or less says A size above zero. (only the step may be none). They start from the ones you keep for new homes (Your settings).
| field | the example’s | in |
|---|---|---|
| How was it built? | Recent | |
| Ceilings | To type2.70 |
your unit |
| Outer walls | To type30 |
cm |
| Inner walls | To type10 |
cm |
| Lights | To type105 |
cm |
| Sockets | To type30 |
cm |
Openings
Section titled “Openings”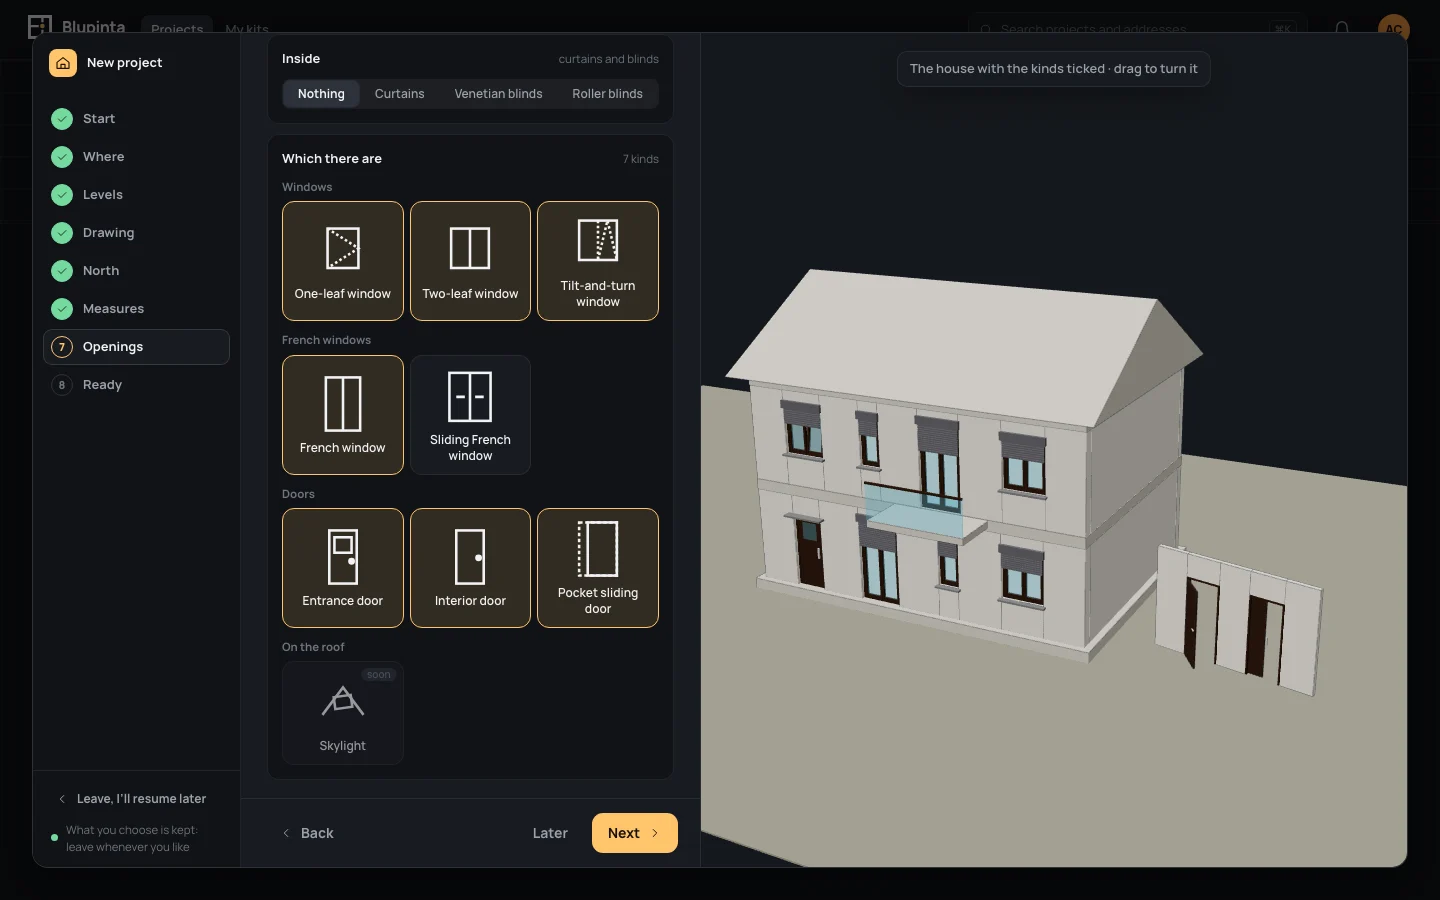
Windows and doors: first how they are made in this house, once for all of them, then which kinds there are. A kind unlike the others is changed later, on its own, in Opening types.
- Frame: its Material (Wood, PVC, Aluminium, Wood-aluminium, Steel) and its colour (White, Ivory, Light grey, Anthracite, Oak, Walnut, Green), named beside the title.
- Outside, what closes them: Nothing, Roller shutters, Louvred shutters or Solid shutters; roller shutters may be Motorised; Insect screens or not. A sliding French window has no wall beside it for shutters, so it gets none.
- Inside: Nothing, Curtains, Venetian blinds or Roller blinds.
- Which there are: tick the kinds the house has, in their groups: Windows (One-leaf window, Two-leaf window, Tilt-and-turn window), French windows (French window, Sliding French window), Doors (Entrance door, Interior door, Pocket sliding door). A click ticks a kind, another takes the tick away; beside the title, how many. On the roof, the Skylight says soon: it comes with roofs, which the house doesn’t have yet.
On the right, a house in 3D wears the kinds ticked, made as chosen: the windows and French windows on its front, the entrance below, the doors inside on a partition beside it; a kind just ticked grows into its holes. Drag to turn it. Doors have no shutters, screens or curtains. Next makes the ticked kinds the house’s types, all in one change; a kind the house already has isn’t made twice. For the example, tick all but the Sliding French window.
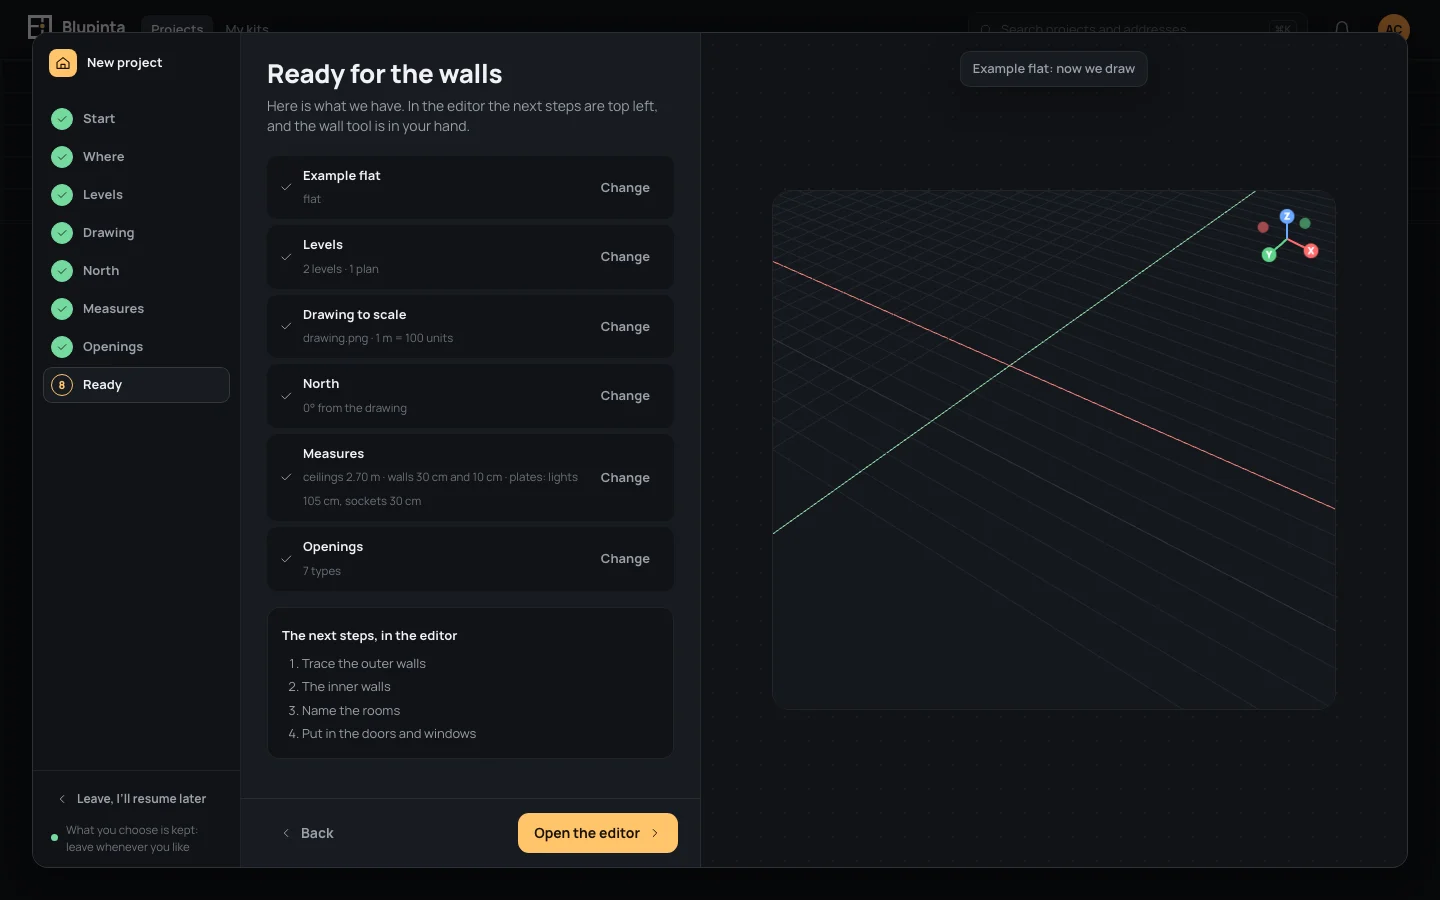
Ready for the walls says what the house has, a line per step: the house (address, kind), Levels (how many, and how many plans), Drawing to scale (the file and its scale), North, Measures, Openings (how many types). A step left for later says for later: it’s in the house whenever you want; Where with no address nor place counts as left for later too. Change goes back to that step. Under the lines, The next steps, in the editor: from the plans, trace the outer walls, the inner walls, name the rooms, put in the doors and windows (from a blank sheet, draw them); from a template, fit its walls to your measures and move its doors and windows to where they really are; then every step put off (Measures (put off)).
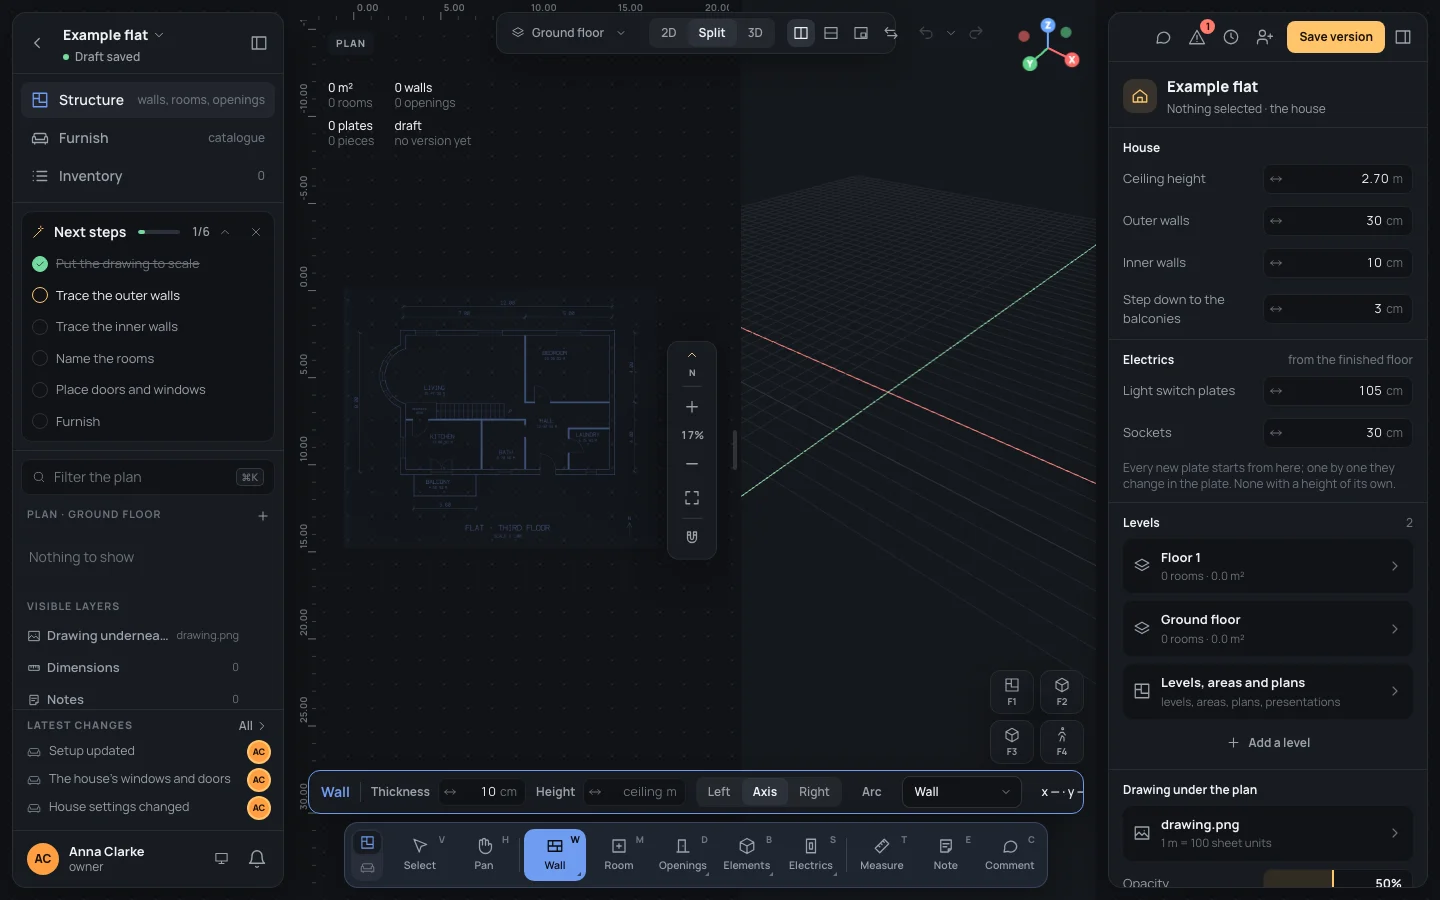
Open the editor finishes: the editor opens with the wall tool in your hand (Wall) and the next steps top left.
Leaving and coming back
Section titled “Leaving and coming back”- Leave, I’ll resume later at any step, or EscEsc outside the fields: you are back on your projects, and You have a house to finish setting up waits above the list.
- Resume opens the wizard again at the step you left, with what you had chosen, in the same browser. New project does the same: one house at a time is set up. Delete asks first, then the house is gone; left untouched for 30 days, it goes by itself.
- A house already finished goes through the wizard again from its editor: Guided setup in the project’s menu (its name, top left), or, with nothing selected, Guided setup under Library in the house’s settings on the right. It starts again from Start (Run the guided setup again), on the house as it is: it changes only what you change in it.